In our previous blog posts, we have explained about setup terraform cloud and S3 bucket using terraform. We are writing series of blog posts on terraform topics. This will help you to setup terraform and automate your AWS infrastructure. In this blog post, we are going to explain about what is terraform state file and how to write them?. This is the most important file that maintains the complete state of your terraform infrastructure configurations. If any changes to this file automatically reflect in the underlying infrastructure.
Let’s dive into the details now!!
What is the State File in Terraform?
When you run terraform apply command to create an infrastructure on cloud, Terraform creates a state file called “terraform.tfstate”. This State File contains full details of resources in our terraform code. When you modify something on your code and apply it on cloud, terraform will look into the state file, and compare the changes made in the code from that state file and the changes to the infrastructure based on the state file.
Create Resources for State File
Copy this code and paste it in a file called main.tf.
################### VARIABLES ##############################
variable "name" {
  type    = string
  default = "Terraform-state"
}
variable "access_key" {
  type = string
}
variable "secret_key" {
  type = string
}
variable "region" {
  type = string
  default = "us-east-1"
}
################### PROVIDER ##############################
provider "aws" {
  access_key = var.access_key
  secret_key = var.secret_key
  region     = var.region
}
################### EC2 INSTANCE ###########################
resource "aws_instance" "test" {
  ami                         = "ami-052efd3df9dad4825"
  instance_type               = "t2.micro"
  associate_public_ip_address = true
  security_groups             = [aws_security_group.test.name]
  tags = {
    Name = var.name
  }
}
################### SECURITY GROUP ##########################
resource "aws_security_group" "test" {
  name        = var.name
  description = "Allow TLS inbound traffic"
  ingress {
    description = "allow access to web"
    from_port   = 80
    to_port     = 80
    protocol    = "tcp"
    cidr_blocks = ["0.0.0.0/0"]
  }
  egress {
    from_port   = 0
    to_port     = 0
    protocol    = "-1"
    cidr_blocks = ["0.0.0.0/0"]
  }
  tags = {
    Name = var.name
  }
}
################### S3 BUCKET ##############################
resource "aws_s3_bucket" "b" {
  bucket = lower("${var.name}-test-bucket-state-file")
  force-destroy = true
}
resource "aws_s3_bucket_acl" "acl" {
  bucket = aws_s3_bucket.b.id
  acl    = "private"
}
################### OUTPUTS ##############################
output "IpAddress" {
  value = aws_instance.test.public_ip
}
output "BucketName" {
  value = aws_s3_bucket.b.bucket
}
The above code creates an EC2 instance with a Security Group and creates a S3 Bucket also.
Run terraform apply command to create resources on our AWS Cloud.
Format of Terraform State File
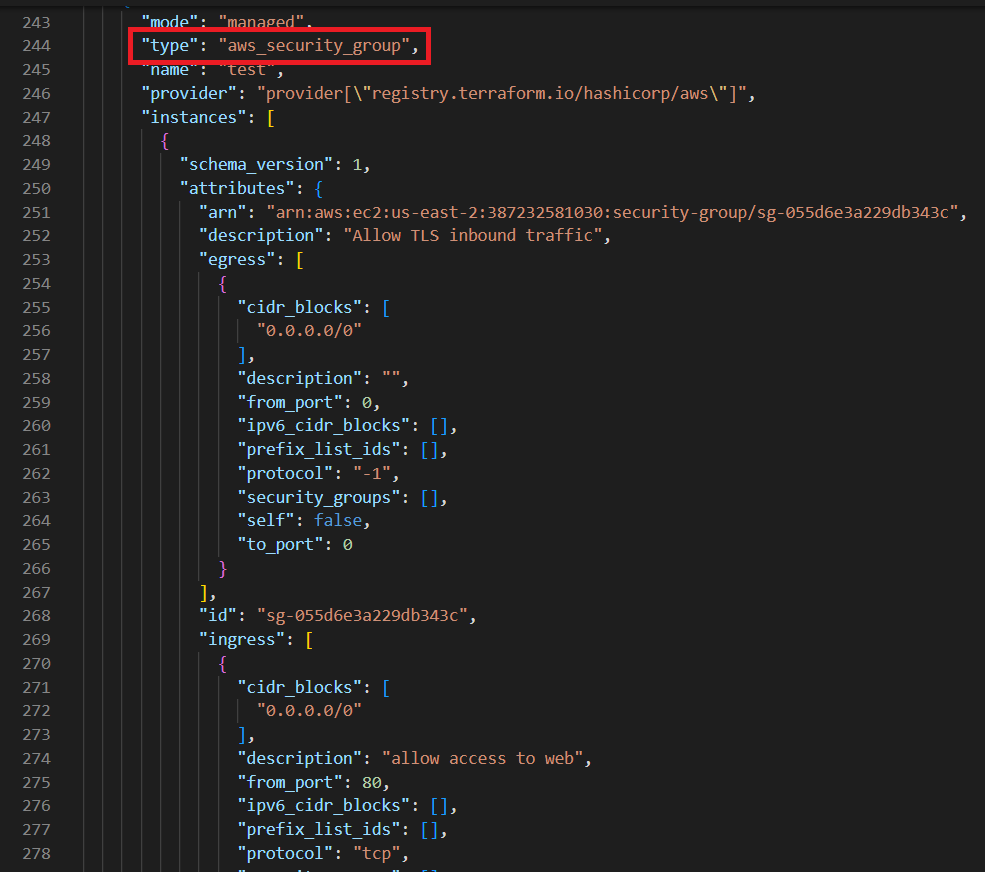
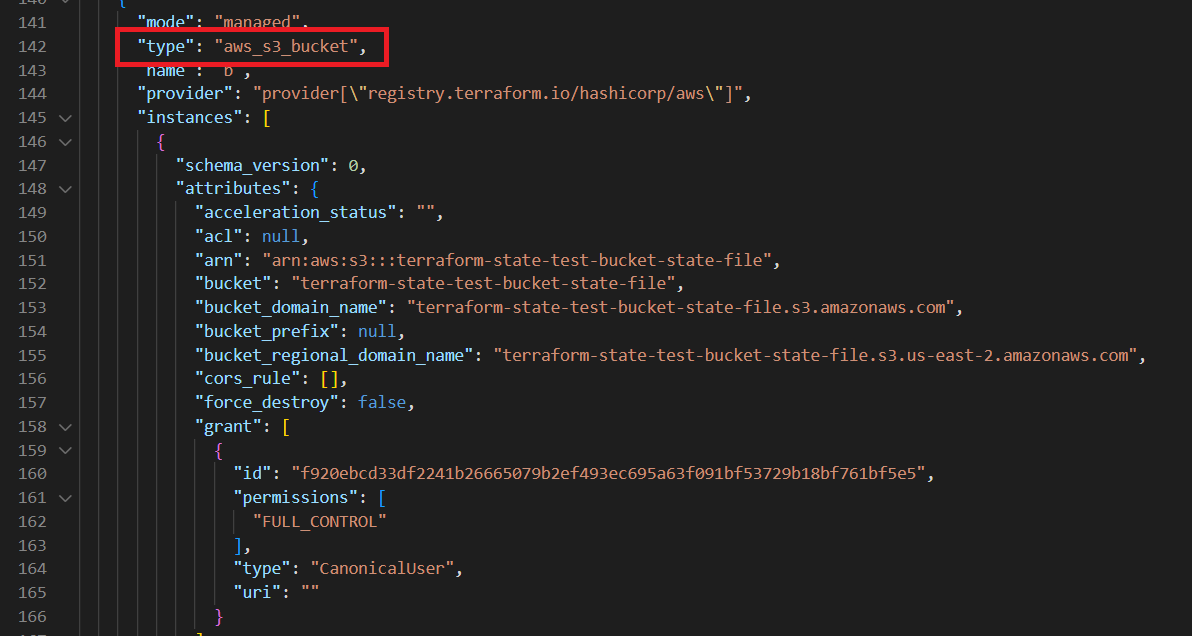
Terraform State File is written in a simple readable language “JSON”. It looks like in the Screenshots below. So, this State File contains all the information of the resources which we created using our Terraform code.
After the resources creation complete, there will be file created called terraform.tfstate.
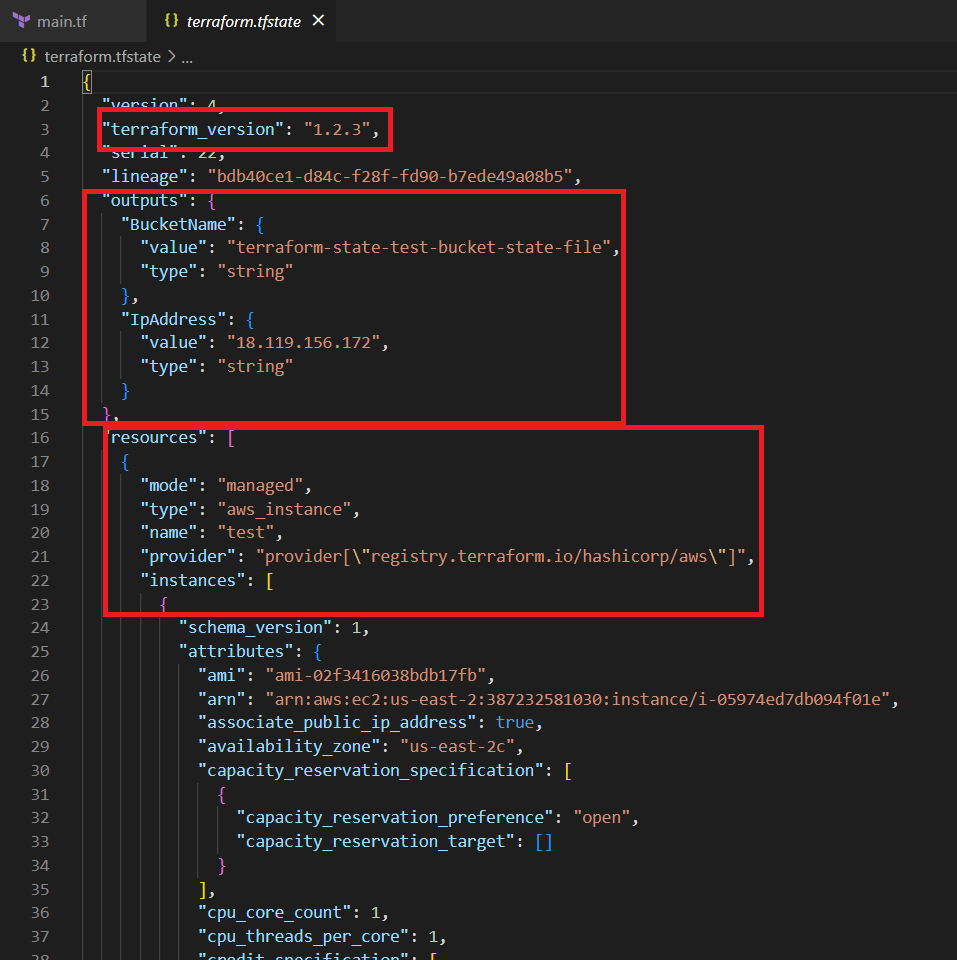
- In the outputs section, we get the Ip Address of our Instance resource and the name of the s3 bucket.
- In the resources section, first it gives the details of the EC2 instance.
- The second image contains the details of the security group and the third one is the S3 bucket.
Let’s understand the purpose of some of the blocks mentioned in the above code:
- “terraform_version” which says the version of our terraform code
- “outputs” which has the outputs of our code and
- “resources” contains complete details of the resources in our code.
What is the Terraform Backup State File?
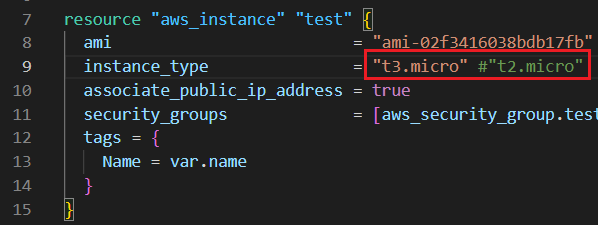
Terraform has another file called terraform.tfstate.backup . This file is like a version of the tfstate file. For now, just change the Instance Type from “t2.micro” to “t3.micro” and apply the code.
In the below image you can see the difference between the tfstate file and tfstate.backup file. The type of the instance is changed in the tfstate file and remains the old type in the backup state file.
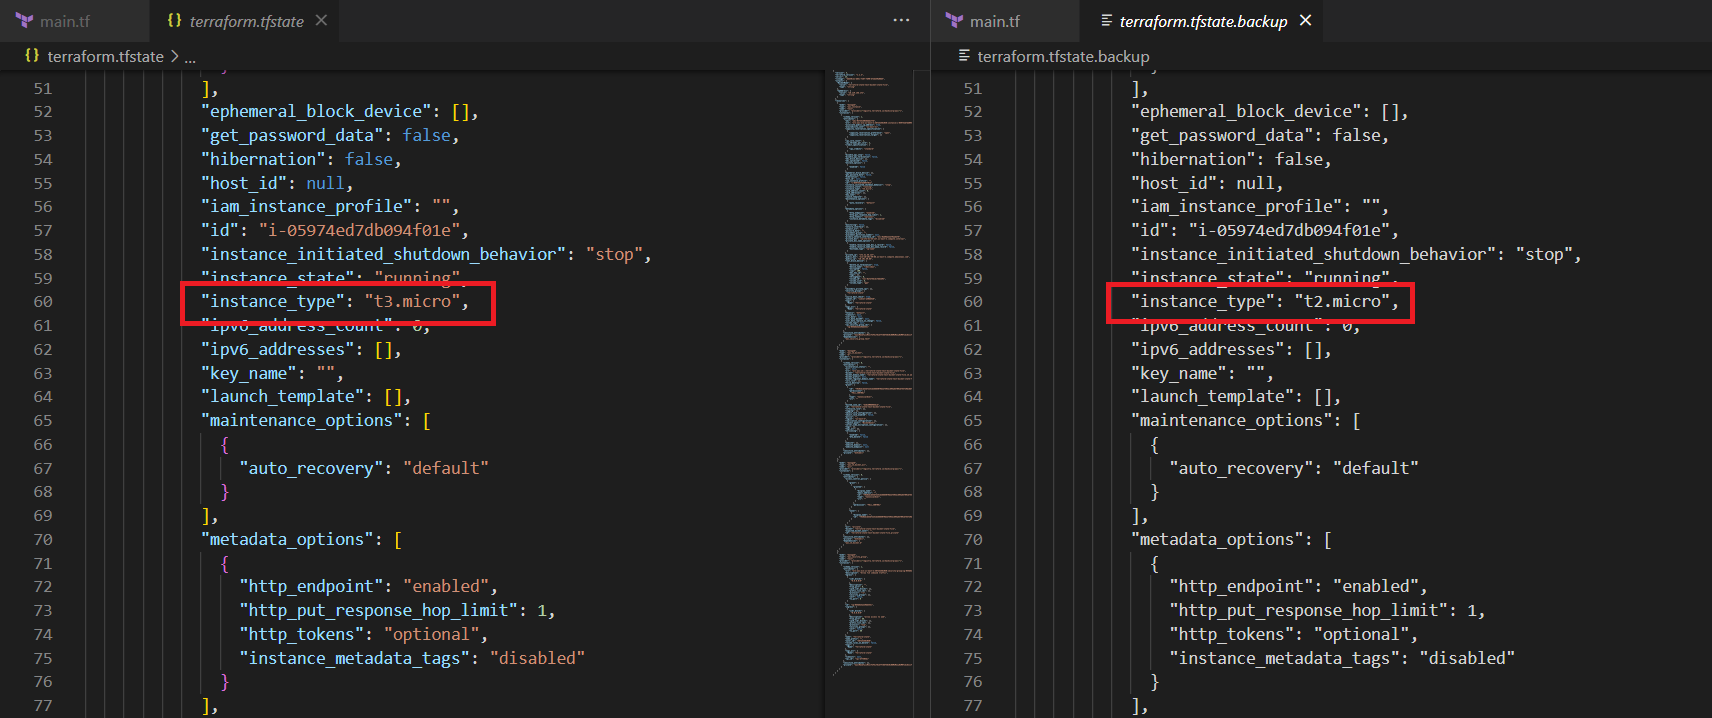
Whenever we modify something on our code and apply it, our tfstate file will change our resources’ information. At that point this backup file acts as an old version of the state file. So the modified resources details are in the tfstate file, and the old tfstate file will be transferred to tfstate.backup file.
How to Manage Terraform State File?
- So, if you are working in terraform just for your personal project, storing your tfstate file in your local system is just fine. But when you work in terraform with your team, all of your team members need to access that state file. At that point you need to store the state file in a shared storage system like GitHub, Bitbucket, GitLab, S3 bucket, etc.
- When you apply the code, there is a chance that at the same time any of your team members can apply the different version of the code using the same state file. This will throw an Error. But many of the version control systems didn’t provide any form of locking system to prevent this.
- To fix this we need to keep this file in the common location which can be accessed by all team members. Store the state file in a S3 bucket. Using the combination of DynamoDB and S3 bucket, we can lock the state file, whenever run the command terraform apply.
- Terraform Cloud also has a Locking system natively. If any of one run terraform apply, Terraform will automatically lock the state file. If any other teammate runs apply on the same state file at the same time, Terraform waits until the first apply command finishes.
Use S3 for Locking State File
Here is a demo for how to use S3 and DynamoDB for the Locking system.
################### S3 as BACKEND ############################
terraform {
  backend "s3" {
    bucket         = "terraform-state-test-bucket-state-file"
    key            = "terraform.tfstate"
    region         = "us-east-1"
    dynamodb_table = "terraform-lock"
  }
}
################# DYNAMODB FOR LOCKING ########################
resource "aws_dynamodb_table" "lock" {
  name           = "terraform-lock"
  read_capacity  = 5
  write_capacity = 5
  hash_key       = "LockID"
  attribute {
    name = "LockID"
    type = "S"
  }
}
Add this code in the main.tf file.
Here we use our S3 bucket as a backend for storing our state file in shared storage. It helps to use the same state file for multiple users who have access to the S3 bucket. And create a Dynamodb table for locking the state file whenever the terraform uses the State file.
For bucket and dynamodb_table sections inside the S3 backend, enter the value of your bucket name and DynamoDB name respectively.
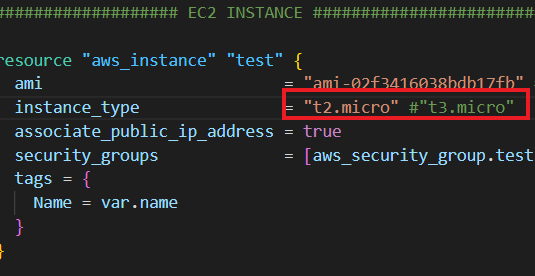
Apply the code to deploy the resources on AWS Cloud. Then modify the Instance type from t3.micro to t2.micro like in the below Screenshot.
After that, open 2 Terminals in VS Code Editor and Apply the modification using terraform apply command in Terminal 1 and follow the same command in Terminal 2 as shown in the below image.
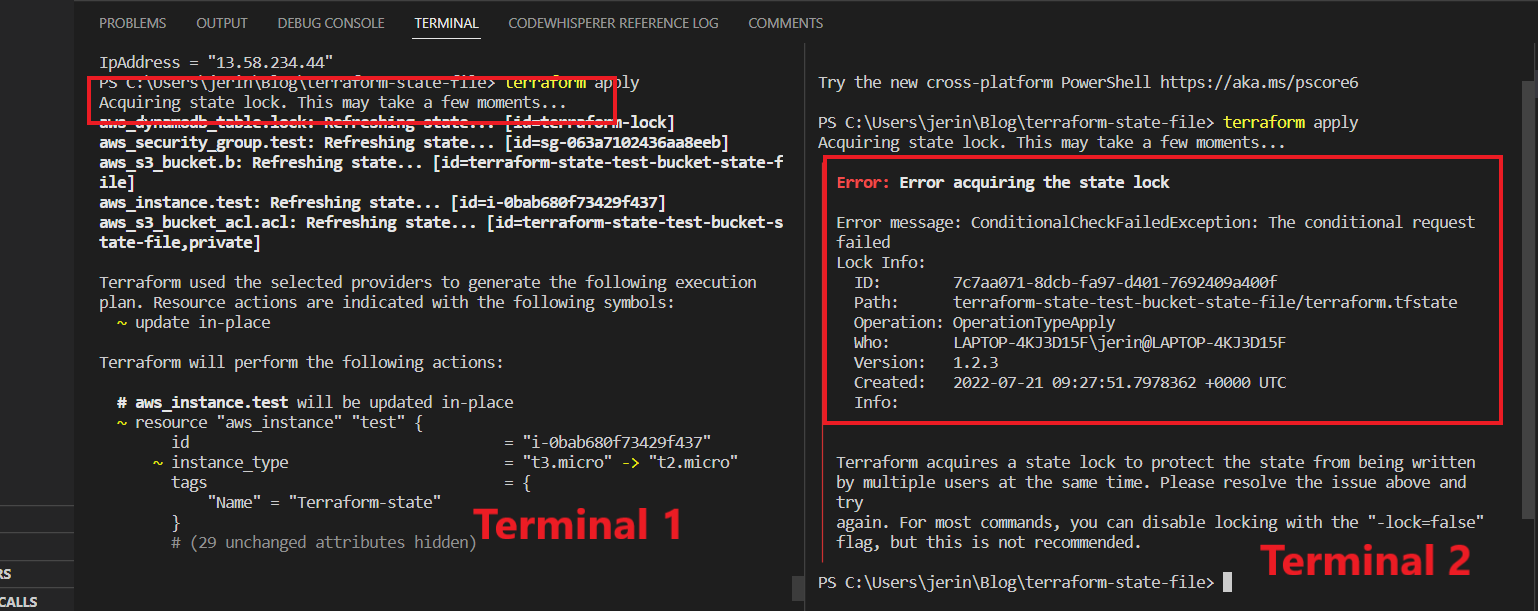
In the Above image you can see in terminal 1, There is a line that shows “Acquiring state lock” while it is running. And in terminal 2 there shows an error which indicates “someone already using the state file” And it gives the details of the user.
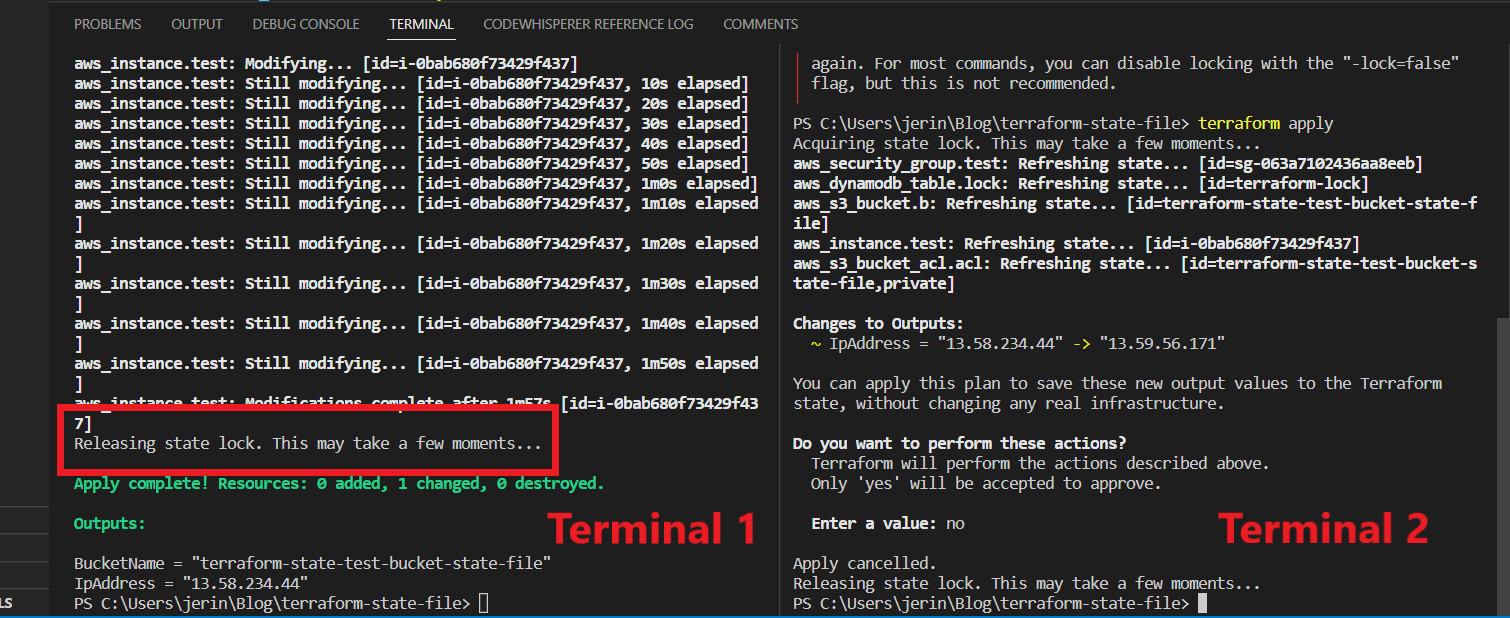
So, after completing the apply command in terminal 1, it says “Releasing state lock”. Then you can run any command in other terminal 2 it runs successfully. This is how the state locking system works…
Whenever You run any command in that state file, DynamoDB Locks the State File Until, that running command is successfully finished. At that time if any of your team members was trying to run a command on that same state file, it didn’t allow him.
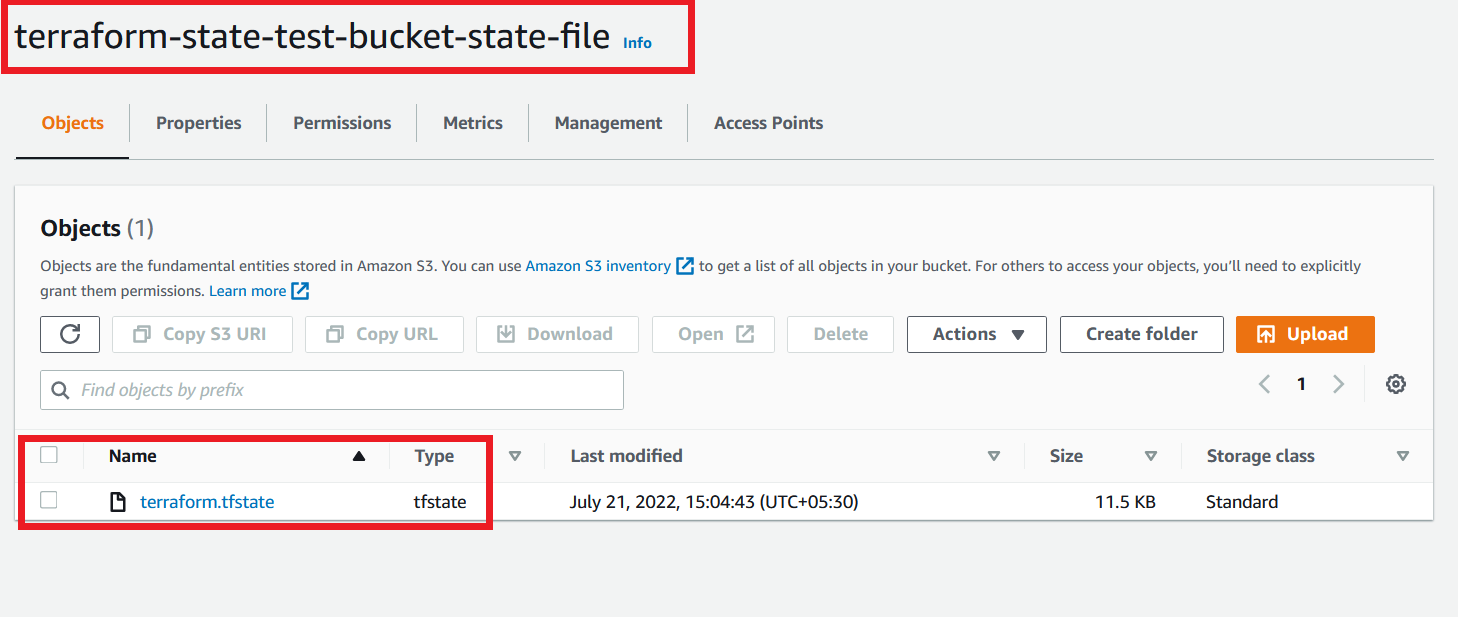
You can see tfstate in your S3 bucket as shown in the image below.
Use Terraform Workspaces for Isolating State File
Using S3 Bucket as backend and DynamoDB Table for Locking it is really helpful with team collaboration.
But now we have configured all our resources in a single file or maybe when you work in a big environment, you may have multiple files for multiple resources in a single folder. So, whenever you run the apply command in that folder, it sometimes gets worse.
For example, if you want to change something for testing purposes in a staging environment, you may have accidentally applied the changes in the Production environment that are really worse. For this type of caution, here Terraform Workspaces comes in. We can use every workspace for each environment.
We can give a single file of the resources for multiple environments. So, if you need to modify only in staging environment, you can do it with workspaces.
Okay, now create a new folder called terraform-workspace, and under the folder create a file main.tf.

Copy the below code to main.tf
################### PROVIDER ##############################
variable "access_key" {
  type = string
}
variable "secret_key" {
  type = string
}
provider "aws" {
  access_key = var.access_key
  secret_key = var.secret_key
  region     = "us-east-1"
}
################### S3 as BACKEND ##############################
terraform {
  backend "s3" {
        # Replace this with your bucket name!
    bucket         = "terraform-state-test-bucket-state-file"
    key            = "workspace-test/terraform.tfstate"
    region         = "us-east-1"
        # Replace this with your DynamoDB table name!
    dynamodb_table = "terraform-lock"
  }
}
################### EC2 INSTANCE ##############################
resource "aws_instance" "test" {
  ami                         = "ami-052efd3df9dad4825"
  instance_type               = "t2.micro"
}
For the bucket and the Dynamodb_table, give the value of the resources which were created by our previous script.
Now run terraform init and terraform apply commands. It creates an Instance and S3 bucket as backend. Run terraform workspace show command to see which workspace you are in. It shows “default” for now.
![]()
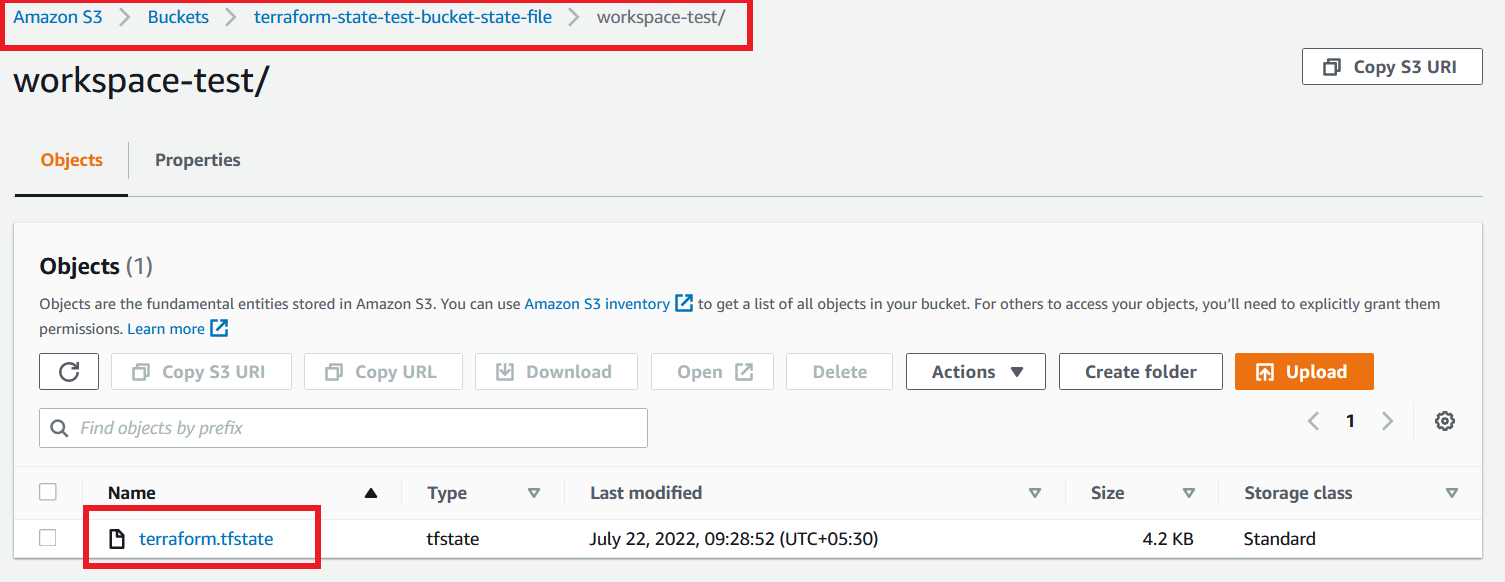
Go to your AWS Account and see your S3 bucket. It has a State File under workspace-test folder which we mentioned in our code.
Now create a new Workspace name test1 using the command terraform workspace new test1
$ terraform workspace new test1

 Created and switched to workspace "test1"!

You're now in a new, empty workspace. Workspaces isolate their state,
so if you run "terraform plan" Terraform will not see any existing state
for this configuration.
Now run a terraform plan to see what happens in our resource
$ terraform plan

 Acquiring state lock. This may take a few moments...

Terraform used the selected providers to generate the following execution plan. Resource actions are indicated with the following symbols:

  + create

Terraform will perform the following actions:

  # aws_instance.test will be created

  + resource "aws_instance" "test" {
      + ami                                  = "ami-02f3416038bdb17fb"
      + instance_type                        = "t2.micro"
(.......)

    }

Plan: 1 to add, 0 to change, 0 to destroy.
You can see in the above code that terraform creates a new Instance. Because we are deploying this code in the newly created workspace test1 not default. So, it just creates new resources in a new workspace.
Run terraform apply to see whether it creates a new one or not.

Yes, you can see the above image creates a new instance on test1 environment.
Now create another workspace called test2.
$ terraform workspace new test2

Created and switched to workspace "test2"!

You're now in a new, empty workspace. Workspaces isolate their state,
so if you run "terraform plan" Terraform will not see any existing state
for this configuration.
Now we are in the test2 workspace. So, now run the apply command to see what changes happened in our resources.

You will see again a new Instance is created by our same code, Because of our new workspace test2.
We are going to list out all the workspaces that we created now, using list command.

You can see the Three workspaces that we created earlier. You can use the select command to switch any of the workspaces at any time
$ terraform workspace select test1

Switched to workspace "test1".
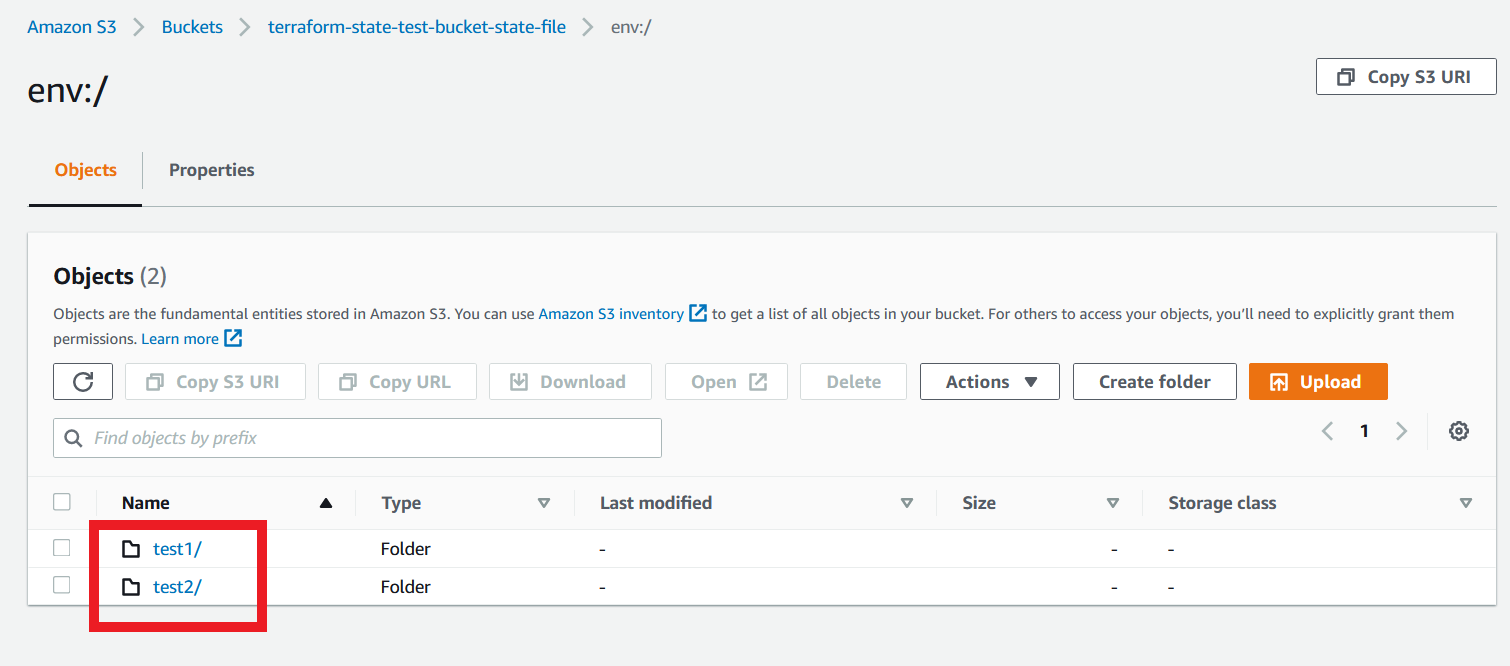
Now we are going to see our state files which are stored in our S3 bucket. So, navigate to AWS console and S3 bucket page, select your S3 bucket, you can see 2 folders inside the bucket.
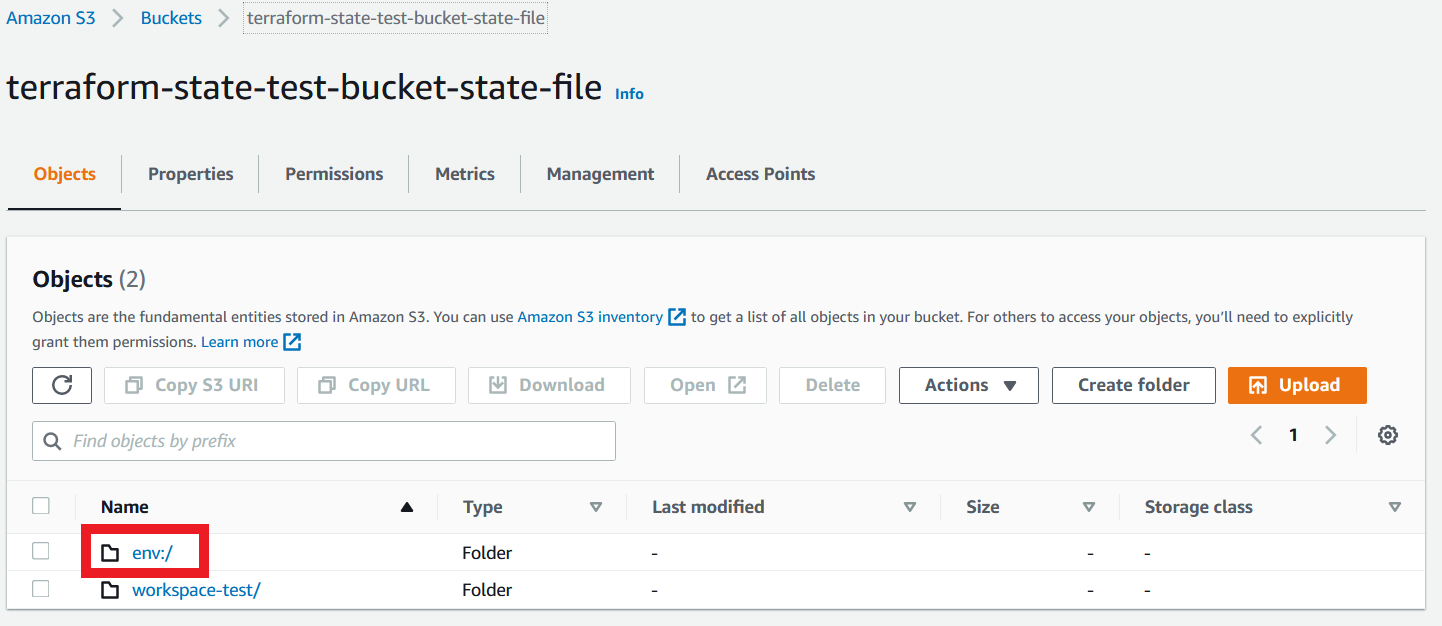
The one workspace-test is the folder that contains the state file of the “default” workspace. The other one env is the folder that contains all other workspaces that are manually created by us. Inside the env folder, you will find each of the workspaces’ folders. For our use case, you are able to see inside each folder that contains workspaces-test/terraform.tfstate file.
This feature is very helpful, for working in multiple environments, that any changes made in an environment didn’t affect any of the other environments.
Basic commands for Terraform State
- terraform state list
List all the objects that are present in the state file. Just take a list of all the resources names.

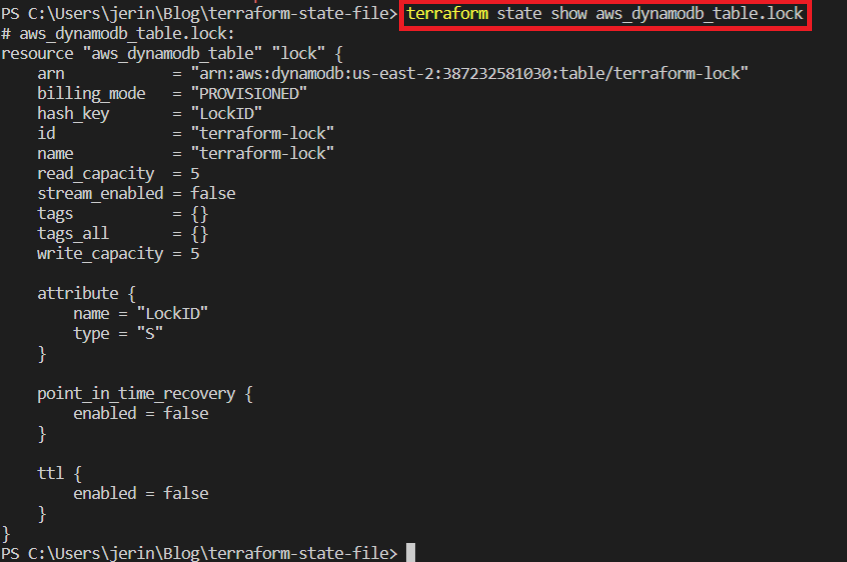
- terraform state show <resource_name>
Show details about an object in the state file. It gives complete details of a particular resource mentioned in the command.
- terraform state mv <resource_name>
If you rename a resource block in your configuration, you need to retain the existing object but track it under a new name. In this time, you apply this configuration changes, terraform will delete the old resource and create a new one with the new name. But using this command we just move the new configuration to the old one with the new name. So, it won’t delete the resource and recreate it, just modify the changes.


For this scenario I just modify the resource name of the instance and the output of IpAddress from “test” to “test1”. Now you apply the code, Terraform will delete the existing instance and create a new one. But when we use the mv command like in the below image it changes the old name to new one in the state file. So now we run the apply command and it didn’t change anything in our resources.

- terraform state pull
Output of the current state to standard out (get all resources). It will give the complete detail of our state file in a standard format.
- terraform state push
Update remote state from local. It helps to manually update a local state file to a remote state.
Conclusion
In this article you would have gained some knowledge about the Terraform State File. Hope you will like this article and learnt something new.!!

