GCP VPC Network service is provided by Google Cloud Platform (GCP) which allows you to create and manage your own logically isolated virtual network in the cloud. A VPC provides a secure and scalable foundation for running your applications and services in GCP.
With Google Cloud VPC, you can define and control IP addressing, subnets, routing, and firewall rules for your virtual network in google cloud. It allows you to segment your resources into different subnets, each residing in a specific region. This segmentation helps in organizing and isolating Various components of your Cloud infrastructure, providing improved security and network performance.
Creating a GCP VPC Network using Terraform allows you to automate the provisioning and configuration of your network infrastructure. Terraform is an infrastructure as code (IaC) tool that uses declarative configuration files to define and manage your infrastructure. By leveraging Terraform, you can easily create and manage a GCP VPC Network with its associated subnets, firewall rules, routes, and other networking components. This provides a repeatable and consistent way to create and maintain your network infrastructure, reducing manual effort and ensuring infrastructure consistency across different environments.
In this blog, we will create a VPC Network with Public and Private subnets and a Cloud Nat with Route using Terraform script. Let’s dive into the demo.
Prerequisites to Create GCP VPC Network
Before diving in please make sure that your machine you have to install the following tools.
Configuring GCP CLI
Open VS Code editor with the folder where you will write your terraform script. Then, select the terminal at the top of the VS code and click the New Terminal button. It will open a command line terminal.

Run the following command in the terminal to authenticate with your Google Cloud account.
gcloud auth login

It will redirect you to your browser and ask you to choose the Gmail account that you have in your GCP account. If you haven’t been redirected to the browser like the below picture, Press the ctrl button on your Keyboard and click the link that would appear in your terminal like the above screenshot.

It will ask for some access to your GCP account. Make sure you have read all the things and then click Allow button.

Now you will be redirected to a confirmation page that looks exactly like the below picture. You can go to your VS code editor terminal and that will look like the second picture.


Writing Terraform script for Create VPC Network
In the VS Code editor create a new file called main.tf and copy the below script and paste it in the file.
provider "google" {
  project = var.project_id
  region  = var.region
}

data "google_compute_zones" "this" {
  region  = var.region
  project = var.project_id
}

locals {
  type   = ["public", "private"]
  zones = data.google_compute_zones.this.names
}

The second resource “google_compute_zones“ will help to get the list of all availability zones in the specific region.
Create another file variables.tf and paste the below code into that file.
variable "project_id" {
  type           = string
  description  = "Project ID"
  default        = "<your-project-id>"
}

variable "region" {
  type           = string
  description  = "Region for this infrastructure"
  default        = "us-central1"
}

variable "name" {
  type           = string
  description  = "Name for this infrastructure"
  default       = "<any-name>"
}

Change the default value for the project_id with your GCP Project ID like the above picture. Also, you can change the region as your wish.
Enter a name for the name variable.
Now again in the main.tf file, add this code in that file like the following screenshot.
# VPC
resource "google_compute_network" "this" {
  name                                        = "${var.name}-vpc"
  delete_default_routes_on_create = false
  auto_create_subnetworks           = false
  routing_mode                            = "REGIONAL"
}

The above terraform code will able to create VPC Network without any subnets.
In Google Cloud VPC Network is Global, which means it will span all regions.
Run terraform init command in the VS Code terminal to initialize the terraform configurations. It will download the latest version of the GCP terraform provider inside your local directory.

Once the initialization is completed, run the following apply command to create GCP VPC Network. It will ask for confirmation. type yes to approve.
terraform apply

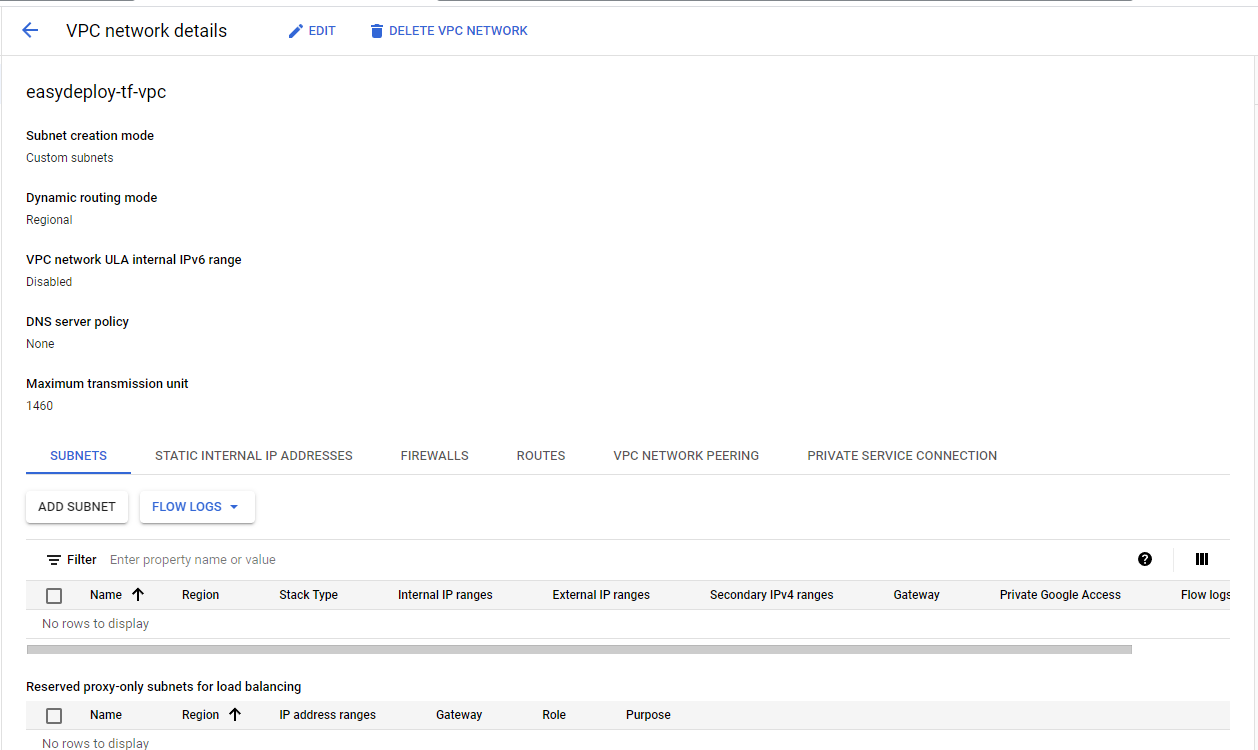
Now open your GCP account in the browser and in the left side Navigation menu scroll down to the Networking section, select VPC Network and click the VPC Networks button.

You can see the GCP VPC Network is created in the following screenshot. Click the name of the VPC and you can see the details of the VPC.


Create Public and Private Subnets
We have created our VPC Network without any Subnets. So now we will create 2 subnets for public and private. Basically, Subnets in Google Cloud are Regional, which means they will spawn in all the availability zones in a region.
Now we are going to create Public and Private subnets in a single region.
Copy the following code and add it to the main.tf file.
# SUBNETS
resource"google_compute_subnetwork""this" {
count= 2
name="${var.name}-${local.type[count.index]}-subnetwork"
ip_cidr_range= var.ip_cidr_range[count.index]
region=var.region
network=google_compute_network.this.id
private_ip_google_access =true
}
The above code will create public and private subnets. For ip_cidr_range we need to add a variable.
So open variables.tf file and add the following content into that file.
variable"ip_cidr_range" {
type=list(string)
description="List of The range of internal addresses that are owned by this subnetwork."
default=["10.10.10.0/24", "10.10.20.0/24"]
}
I have provided a list of IP ranges for subnets. It will take these 2 IP ranges to the subnets.
Run apply the command to create subnets. You can see that 2 subnets are going to create.

Once the apply completed, Open the GCP console and get into the created VPC, and you will able to see the subnets.

Create Cloud Nat and Attach it with Private Subnet
When a Private subnet is associated with a Nat gateway, then only it would consider private. Because private servers need to communicate with the internet for patch installation or any other software upgrades. But they are private so they can’t able to communicate on the Internet. So the Nat gateway will help the private servers to communicate with the internet with the help of a Public IP. When you create a Cloud Nat in Google Cloud, it will create a Public IP along with it.
Now we need to create a Cloud Nat and associate the NAt with the Private subnet.
Open your VS Code editor and add the following code to the main.tf file. this code is able to create Cloud Nat and associate it with the private subnet.
# NAT ROUTER
resource "google_compute_router" "this" {
  name    = "${var.name}-${local.type[1]}-router"
  region  = google_compute_subnetwork.this[1].region
  network = google_compute_network.this.id
}

resource "google_compute_router_nat" "this" {
  name                               = "${var.name}-${local.type[1]}-router-nat"
  router                             = google_compute_router.this.name
  region                             = google_compute_router.this.region
  nat_ip_allocate_option             = "AUTO_ONLY"
  source_subnetwork_ip_ranges_to_nat = "LIST_OF_SUBNETWORKS"
  subnetwork {
    name                             = "${var.name}-${local.type[1]}-subnetwork"
    source_ip_ranges_to_nat = ["ALL_IP_RANGES"]
  }
}

Once the creation is completed open the GCP console and search for Nat and click the Cloud Nat link.


There you can see the Cloud Nat could be created. Click the name of the cloud Nat to see the details of that Nat.

Looks like in the above image you will find the Private subnet associated with this Cloud Nat. We have successfully created VPC Network with Public and Private Subnets and Cloud Nat.
Also Read: Save big on AWS cost | Reduce AWS bill using terraform (easydeploy.io)
Conclusion
In this blog post, we explored the process of creating a Google Cloud VPC Network with both public and private subnets, along with the configuration of Cloud NAT using Terraform. By following the step-by-step guide, you gained hands-on experience in leveraging the power of Infrastructure as Code (IaC) to set up a robust networking architecture in GCP. We also explored the configuration of Cloud NAT, which allows private instances in the VPC to access the internet while keeping their IP addresses hidden. Cloud NAT provides secure and controlled outbound connectivity for private resources, ensuring efficient communication with external services.
Using Terraform, we defined the necessary resources such as VPC networks, subnets, firewall rules, and Cloud NAT configurations in a declarative manner. This approach brings consistency, repeatability, and version control to your infrastructure deployments. By writing reusable Terraform modules, you can further enhance your efficiency and maintainability.
By mastering the creation of a GCP VPC with public and private subnets, along with Cloud NAT using Terraform, you have acquired a valuable skill set for designing and managing resilient and scalable network architectures in the Google Cloud. Embrace the principles of Infrastructure as Code, continuously expand your knowledge, and stay up-to-date with the latest advancements in GCP networking.
We hope this blog post has provided you with practical guidance and insights into creating a GCP VPC with public and private subnets, along with Cloud NAT, using Terraform. By utilizing these techniques, you can efficiently build and manage your network infrastructure, enabling secure and seamless communication within your GCP environment.
Happy Reading! Will see you in the next blog post!


