In this article we are going to learn about how to create a custom image in Google Compute Engine. Custom image is a boot disk image that you can import a boot disk image to Compute Engine from your on-premises environment or from another cloud platform.
It will be a step-by-step process for how to create a custom image in Google Compute Engine on Google Cloud Platform.
Let’s get into this article and learn about custom image. Stay tuned here, we will keep publishing a lot more articles on Google Cloud.
Overview
- Before creating a Custom image you should have at least one instance running on your project. By using this existing instance we will create an image of that particular instance.
If you want to know about how to create an instance. Please have a look at our previous blog on “how to create an instance in Google Compute Engine” to have a better understanding.
- After creating the custom image we will create an instance template based on the specific image which we have created in the previous step.
In our previous blog we also explained “how to create an instance using instance template” to have a better understanding of Instance templates.
- By using this instance template we will create a VM instance for that specific image.
Introduction
The purpose of using the custom image is to increase boot up time in installing OS patches and software at the launch of VM instances. So, whenever you create an instance and install a lot of software or a lot of OS patches then it takes a lot of time to launch that VM instance.
To avoid the above process the best approach is to create a custom image with OS patches and software pre-installed. So, by doing this you can create one or more instances using that custom image.
In Google Cloud you can actually create a custom image in a number of ways through instances, persistent disk, snapshot and cloud storage. Once you created the custom image you can actually share this with across projects.
Google cloud also provides the features to deprecate all images. So, whenever you create an image and if it exists over a period of time or if it becomes an old image you have the option for making it as deprecated.
Steps for creating a Custom image
Ensuring the Running VM
Before creating a custom image you should have one VM instance running in Compute Engine. In the below screen you can see that one instance is running in Google Compute Engine. After verifying the instance is running you need to select the Disk option in the navigation menu.

Selecting a Disks
Disks are nothing but hard disks, which are associated with your virtual machines.
Whenever you create a virtual machine, the operating system of the virtual machine runs on the hard disk which is attached to the specific VM. In the below screen you can see that the specific disk which is attached with your virtual machines.
So, If you want to create a copy of this specific disk you need to click on the create image option under the Action menu. By doing this you can create a image from this specific disk.

Creating a Image
After clicking on the Create image tab you can see the image creation menu in the below screen. Here, you can give the image name and also you can cross check the specific instance name under the source disk tab.
If you want to change the location to Regional you can change according to your Requirement.

After entering the name and changing the location, you can select the type of encryption standard according to your management.
Then, finally click on the create icon at the bottom of the console to create an image from that specific instance. Before clicking on the create icon please ensure that the specific is stopped.

Created a Image
Now, you can see that in the below screen the image has been successfully created.

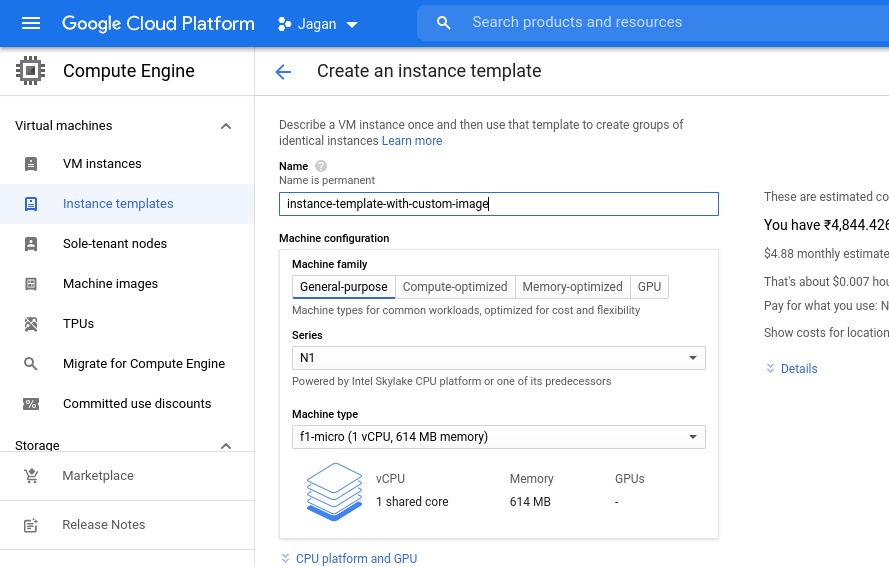
Creating a instance template with that image
After creating an image you need to click on the Instance template from the navigation menu and select the instance template which is already created.
In the below screen you can see the UI of the Instance template.

After clicking on that particular instance template, In the below screen you need to click on the create similar icon to create a similar template with custom image.

Now, you will get the screen below for editing the instance template and give the name for the particular template as well as select the Machine family.
Adding custom image to the Boot disk
Now, to add the custom image in the template you need to click on the change icon in the Book disk tab for adding the custom image to this particular template.

Selecting the specific Custom image
You will get the screen below to select the Boot disk. In that click on the Custom image tab and select the project as well as select the image.
Then. finally click on the select option at the last to create the custom image in this instance template.

Removing the install process in startup script
After selecting the Custom image you need to remove the install command in the startup script which is already present in the Instance template.
The reason behind removing the install command is, we have already installed and taken a copy of that image. So you don’t need to give the install command in the startup script.
Therefore, you need to click on create option at the last after filling all the requirements in the instance template.

Created a Instance Template with Custom Image
In the below screen you can see that the instance template with custom image has been successfully created. Now you can select the Create VM under the Action tab to create a VM.

Instance created with Custom Image
After clicking on the Create VM from the Instance template, In the below screen you can see the Instance has been created successfully.
Here, you need to click on the IP address under the External IP to check the status of the instance.

Accessing the Specific Instance
Therefore, In the screen below you can see the working of the instance by accessing the External IP address.

Conclusion
The benefits of using a custom image is that boot time is a little bit faster, since you don’t have to wait for the package to install before the VM begins. Therefore, we have seen how to create a custom image and use that specific image to an instance template to create a VM.
I hope this article will help you in creating a custom image in Google Compute Engine. In the next blog, we will publish a lot more articles on Google Cloud. Till that stay tuned with us!!!
Happy Learning!!!


