In today’s cloud-centric world, the ability to provision and manage infrastructure as code has become increasingly important. Terraform, an open-source infrastructure as a code tool, empowers developers and system administrators to define, create, and manage cloud resources with ease and consistency. This blog post will walk you through a step-by-step guide on creating an Azure VNet using Terraform. Azure VNets are fundamental to network architecture in Azure, allowing you to isolate and secure resources in your cloud environment.
By the end of this tutorial, you will be able to harness the power of Terraform to create a fully functional Azure Virtual Network effortlessly.
Prerequisites
These are the following tools that should be installed on your machine.
Configuring Azure CLI
Open your VS Code editor with the folder where you will write your terraform script. Then, select the terminal at the top of the VS code and click the New Terminal button. It will open a command line terminal for you like the below picture.
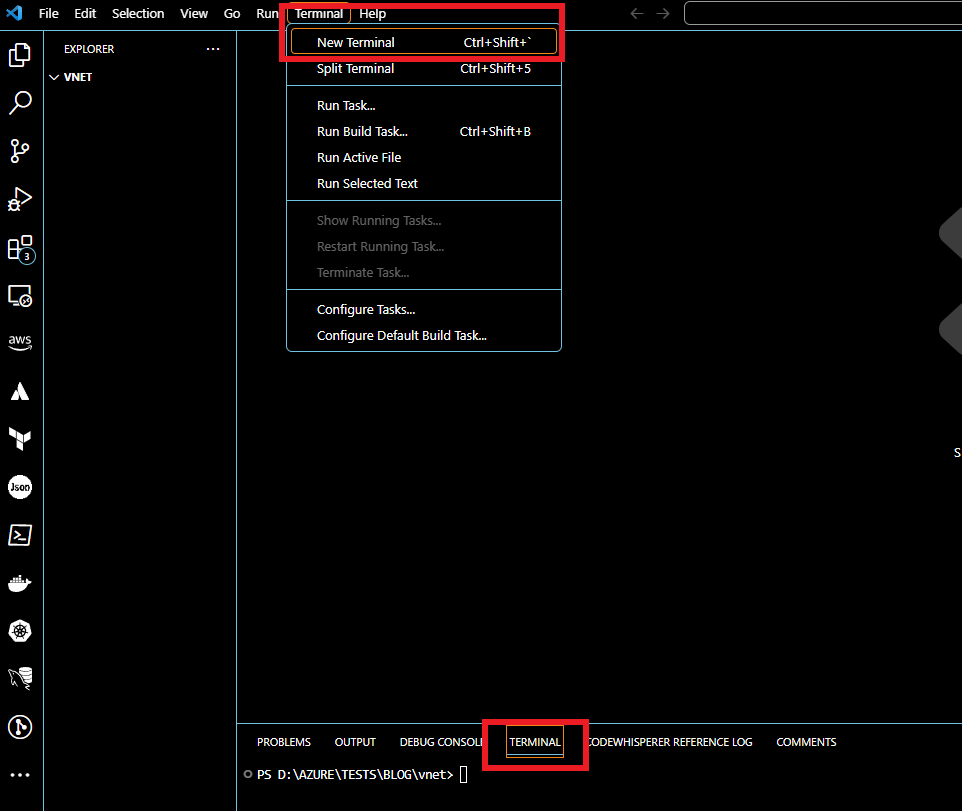
Now in the Terminal type the command AZ login. You will be redirected to your browser and select your Microsoft account to authenticate.

Once you have logged in to your Azure account, you will have a success message like the below screenshot.

Go back to your VS code editor and in the terminal, you will see the authentication details.

We have successfully configured our Azure account for CLI.
Terraform script for Azure Resource Group
Open your Visual Studio Code editor and create the following three files in the folder where you will execute Terraform.
- provider.tf
- variables.tf
- main.tf

Copy the following code and paste it into the provider.tf file.
terraform {
required_providers {
azurerm={
source="hashicorp/azurerm"
version=">= 3.0.0"
    }
  }
}

provider"azurerm" {
features {}
}
resource"azurerm_resource_group""this" {
location= var.location
name="${var.name}-Group"
}
Again write the following code into the variables.tf file.
variable"name" {
type=string
description="Name for this infrastructure"
}

variable"location" {
type=string
description="Name of the region for this infreastructure"
default="East US 2"
}
Now in the terminal type the following code to initialise the terraform requirements.
terraform init.
Also Learn: What is Terraform?
Now run the terraform apply command to execute the terraform script. This script will create a Resource group in Azure.
It prompts you to enter a name. Provide a name for the resource group.
It will show a plan like the below picture and asks for confirmation. Type yes to create the resource.

The resource is created. Now open your Azure console and get into the Resource Group section and you can see the resource groups get created.


Create Azure VNet with Public and Private Subnets
Now let us create Azure Virtual Network with Private and Public subnets.
The following Terraform code will create Azure Vnet and subnets. Copy it and paste it into the main.tf file like the below screenshot.
# Create virtual network
resource "azurerm_virtual_network" "this" {
  name                = var.name
  address_space       = [var.address_space]
  location            = azurerm_resource_group.this.location
  resource_group_name = azurerm_resource_group.this.name
}

# Create subnets
resource "azurerm_subnet" "public" {
  name                 = "${var.name}-public-subnet"
  resource_group_name  = azurerm_resource_group.this.name
  virtual_network_name = azurerm_virtual_network.this.name
  address_prefixes     = [cidrsubnet(var.address_space, 8, 1)]
}

resource "azurerm_subnet" "private" {
  name                 = "${var.name}-private-subnet"
  resource_group_name  = azurerm_resource_group.this.name
  virtual_network_name = azurerm_virtual_network.this.name
  address_prefixes     = [cidrsubnet(var.address_space, 8, 10)]
}

Add the following terraform code into the variable.tf file.
variable "address_space" {
  type        = string
  description = "Cidr range for the Virtual Network"
  default     = "10.10.0.0/16"
}
You can change the default value of the address space whatever you want. This is the CIDR range for your VNet Azure.
Now run terraform apply command to create Azure VNet and Subnets. It asks for the name of the infrastructure and provides the same name as you have entered the last execution for creating a Resource Group. Then review the plan and enter yes.

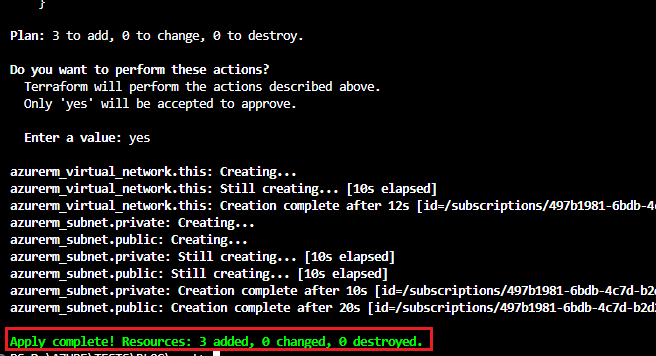
Resources get created. Now go to the Azure console and click the created resource group, there you can able to see the created Azure Virtual network.

Click the Azure Vnet and select the Subnets link, you can find the created public and private subnets.

We have successfully created the Azure Virtual Network and its Subnets.
Create Nat Gateway and attach it with a Private subnet
For now, we have successfully provisioned Public and Private subnets. But what makes Private subnets private? That subnet should be allowed outbound internet access only via Nat Gateway. So that we have to create a Nat gateway and associate it with a Private subnet.
Add the below codes into the main.tf file. This code will create a Public IP. We need this because Nat Gateway needs an allocated Public IP. Nat transfers the traffic from the Private servers to the Internet via the Public IP.
# Create public IP
resource "azurerm_public_ip" "this" {
  name                = "${var.name}-Public-IP"
  location            = azurerm_resource_group.this.location
  resource_group_name = azurerm_resource_group.this.name
  allocation_method   = "Static"
  sku                 = "Standard"
  zones               = [1]
}
#Nat Gateway
resource "azurerm_nat_gateway" "this" {
  name                    = "${var.name}-NAT"
  location                = azurerm_resource_group.this.location
  resource_group_name     = azurerm_resource_group.this.name
  sku_name                = "Standard"
  idle_timeout_in_minutes = 10
  zones                   = [1]
}

# Nat - Public IP Association
resource "azurerm_nat_gateway_public_ip_association" "this" {
 nat_gateway_id       = azurerm_nat_gateway.this.id
 public_ip_address_id = azurerm_public_ip.this.id
}

# NAT - Subnets association
resource "azurerm_subnet_nat_gateway_association" "this" {
 subnet_id      = azurerm_subnet.private.id
 nat_gateway_id = azurerm_nat_gateway.this.id
}
Run terraform apply command. Enter the same name and validate the plan and type yes to create.

Once the Terraform apply is completed, navigate into the Azure console and select your resource group and click refresh. Now you will see the created Nat gateway with the public IP.

Select the Nat gateway that you have created and on the left side panel, click the subnets. As you have seen only the private subnet gets associated with the Nat gateway.

From now if any server is created within the Private subnet, the outbound traffic is allowed only by the Nat Gateway. That’s what Nat Gateways do.
Conclusion
In this blog post, we learned how to use Terraform to create an Azure VNet with both public and private subnets. Terraform’s infrastructure as code approach allowed us to define our desired network architecture using declarative syntax. By following the step-by-step guide, we gained hands-on experience in provisioning a fully functional VNet in Azure.
The creation of Azure Virtual Network with public and private subnets offers numerous advantages in terms of security, scalability, and resource isolation. With public subnets, we can expose specific resources to the internet while keeping other resources secure in private subnets. This architecture enables the seamless deployment of multi-tier applications, with front-end components in the public subnet and back-end components in the private subnet.
Terraform’s ability to codify our network infrastructure brings repeatability and consistency to our Azure VNet creation process. We can version control, share, and automate the deployment and management of our Azure VNets. This reduces the risk of errors and ensures a more reliable and efficient infrastructure. As we continue our cloud journey, we can further enhance our Azure Virtual Network by exploring additional configurations such as network security groups, route tables, and virtual network peering. With Terraform and Azure VNets, we have the tools to build robust and secure cloud networks that serve as the foundation of our cloud infrastructure.
If you are looking for any professional support to architect, provision, manage your infrastructure using terraform you can contact us using the link.We will be able to assist you at any levels.
FAQ
- Why do I create a Virtual Network in Azure using Terraform instead of using Azure Portal?
Creating a Virtual Network in Azure is not a single resource creation. It should have some set of resources with it to create a complete Virtual Network. So manual creation of this process will be difficult. However, managing multiple services with Terraform is very handy.
- Can I create multiple subnets within the Azure VNet using Terraform?
Yes, you can create multiple subnets by defining additional subnet blocks within the Terraform configuration for the Azure VNet.

