Are you wondering how to install Drupal in CentOS server? If yes, then we got your covered as we will go through the process step-wise.
Drupal is a free open-source content management system(CMS) which aids content management for a website. It intended purpose it to enable non-technical users to build and publish content on their website. A large supportive community supports Drupal
Drupal is customizable to the core, where you can change the design of a website without the need to change the core code or content. Similarly, if you change the content, the design remains unaffected. The core features of the Drupal are not dependent on each other which gives the users the best possible customization.
It is highly accessible to both technical and non-technical users. Moreover, it is reliable, secure and offers scalability without compromising on flexibility. The modules play a crucial role in defining how the administrator and end-user function in Drupal. The functionality comes from the modules.
Also, check out our detailed DigitalOcean vs. Linode Vs. Vultr Comparision
In short, Drupal is a very effective website development tool which adheres to modern object-oriented coding patterns and standards. Its functionality can be extended by add-ons which come in the form of modules and themes. Drupal CMS is an effective website building tool that is primarily supported by open-source communities. These communities also provide excellent support in addition to contributing to the ecosystem of Drupal by creating modules and add-ons.
How to Install Drupal in CentOS server?
Step 1: Login into Digital Ocean Console
1. Login to the DigitalOcean Console and then click on Droplet on your left side. Then click on ”Get Started with a Droplet” as shown below
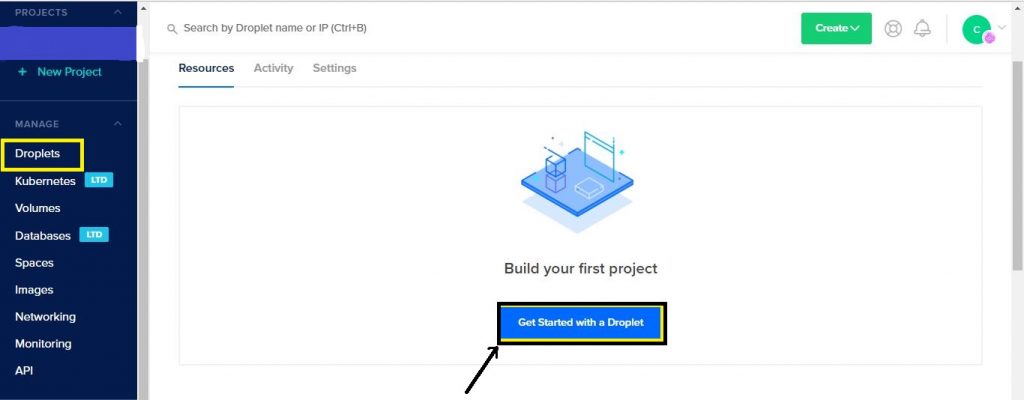
It will take you to the next screen.
Step 2: Choose Image as CentOs
2Now chose your Image as CentOs and then chose the plan as Standard plan.
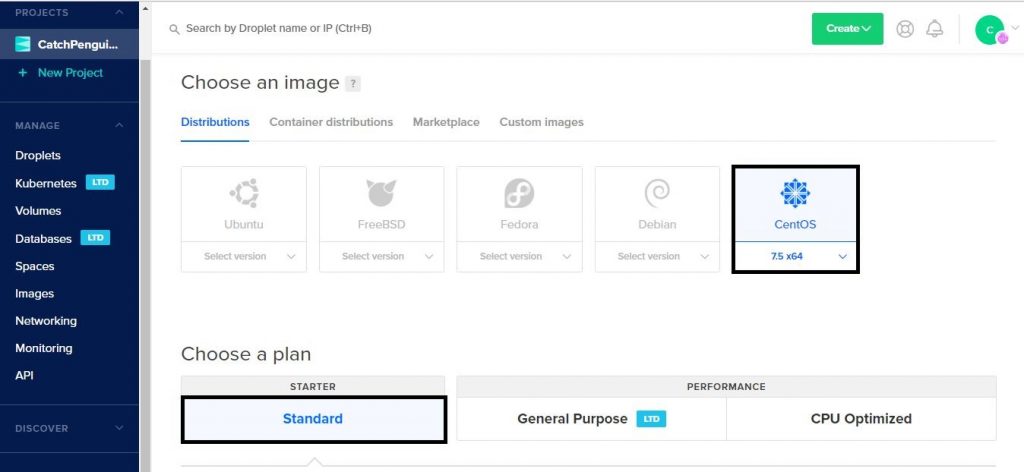
Step 3: Choosing Hosting Plan and Backup Option
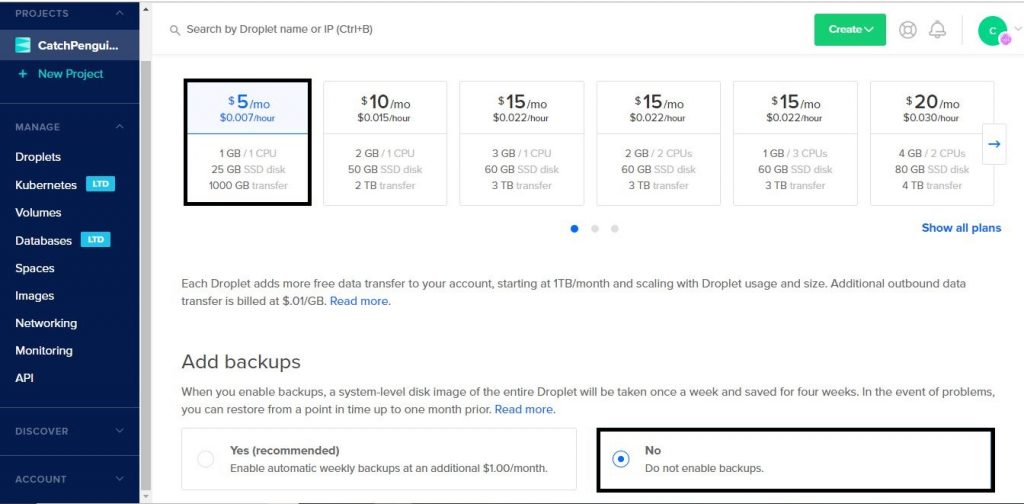
3You can select a backup plan in case you want to back up your data where the cost depends on the size of your data files. Here, you can also proceed without choosing the backup option. In the default image, we chose we have a disk space of about 25GB. If you need additional disks to be attached to your server just click on “add volume,” and then attach the additional storage volume to your server.

Step 4: Select the Data Center Region
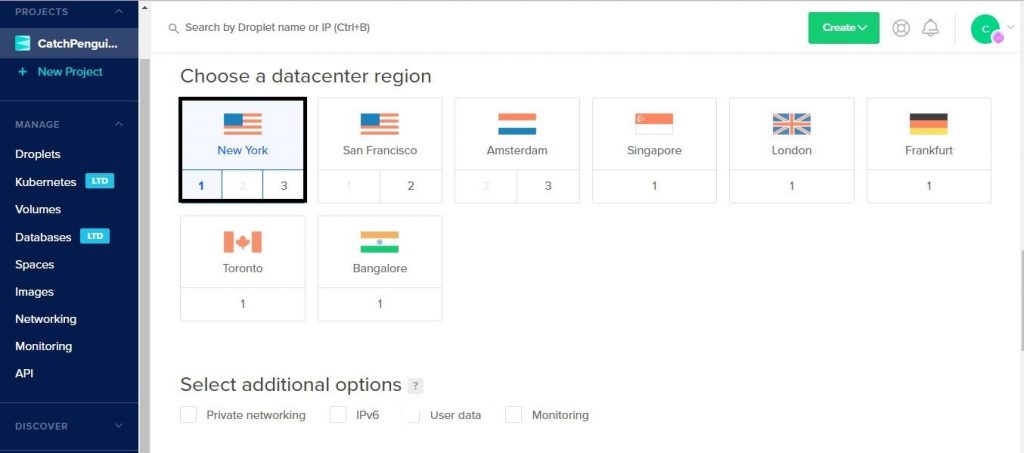
4Now select the region where you are going to launch your server. Currently, DigitalOcean offers you eight regions. The region selection should be based on your customer’s location. Choosing the appropriate region will give a better performance of your site. Here we will select “New York” as the preferred region.
Step 5: Add New SSH Key
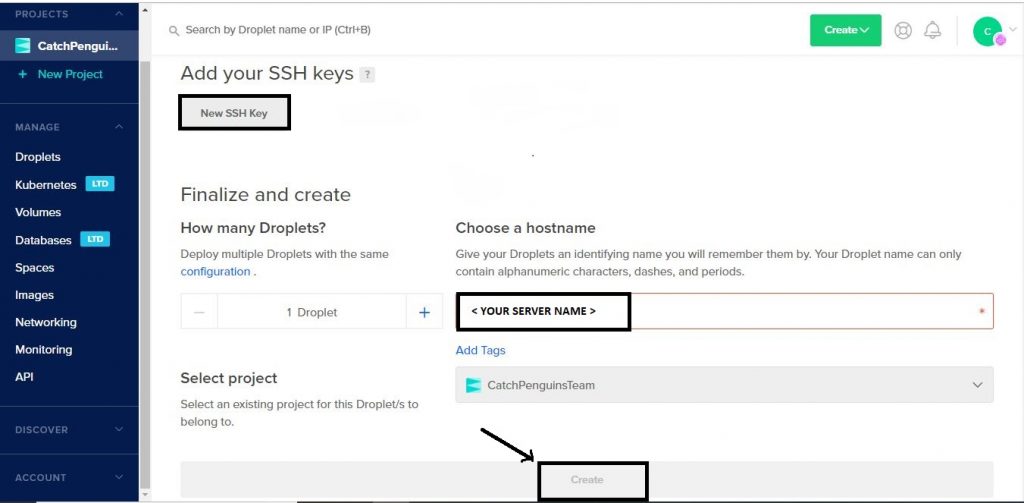
5Now add your public key by clicking on the Add New SSH key. Finally, give your desired name to your server and click on the create button as shown in the below screenshot. Now your droplet will be launched within a few seconds.
Step 6: Login in your Server
Finally, Login to the server using public IP assigned to your server. By default, your key will be added to the root user. You can log in to your server using the following command
| ssh root@<public IP of your server> |
Now access the below link and then copy the codes and save it in a new file. Let us say drupal.sh
| https://raw.githubusercontent.com/siru88/DrupalInstallationOnDigitalOcean/master/DigitalOceanDrupalInstall.sh |
Lastly, execute the downloaded script using the below command
| sh drupal.sh |
Once you execute the above command it will take a few minutes to install and then you can access your Drupal site using the public IP.
| https://< public ip of your server > |
Step 7: MySQL Root Login and Other Important Information
7. MySQL root login is placed in /root/.my.cnf and website database login credentials are placed in /home/centos/db-login.txt
Web files, on the other hand, are placed in /var/www/html and Magento Admin details logins are placed under /home/centos/DrupalAdmin.Credentials.
This leads us to the end of our tutorial on How to Install Drupal in CentOS Server. So, what do you think about the tutorial? Are you going to use Drupal for your next project? Comment below and let us know.
If you have any questions related to Joomla or any other CMS server support, please write your comments. I will respond to all your questions.

