In our previous articles, we have plained about the Terraform Cloud, Terraform Statefile and Simple Terraform Script. In this article, we are going to get some deep knowledge about the Terraform Workspace with Terraform Cloud. This is an automation process with an end-to-end setup from Bitbucket to AWS via Terraform Cloud for managing multiple environments.
What is Terraform Workspace?
Workspaces are simply referring environments. It helps to store multiple State files independently for multiple environments.
If we use multiple environments like develop, staging and production, we need to manage independent codes for each and every environment.
But with the help of Workspaces, we can use a single code for multiple environments and manage the State files of all the environments independently. It helps to create multiple State files with the same Terraform configurations.
Create Code and Push it to Bitbucket
Create a Repository
Open your Bitbucket account and create a repository.
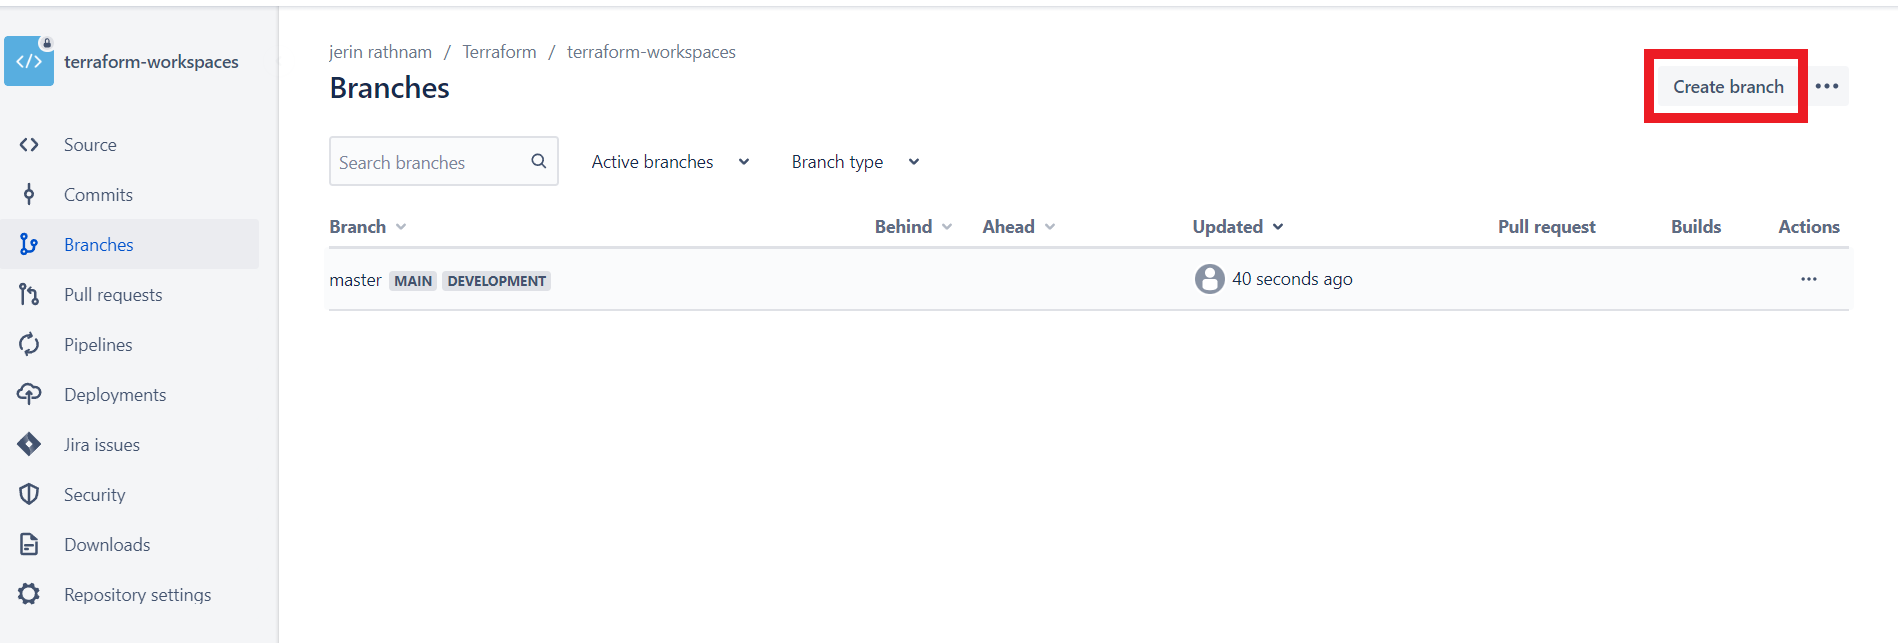
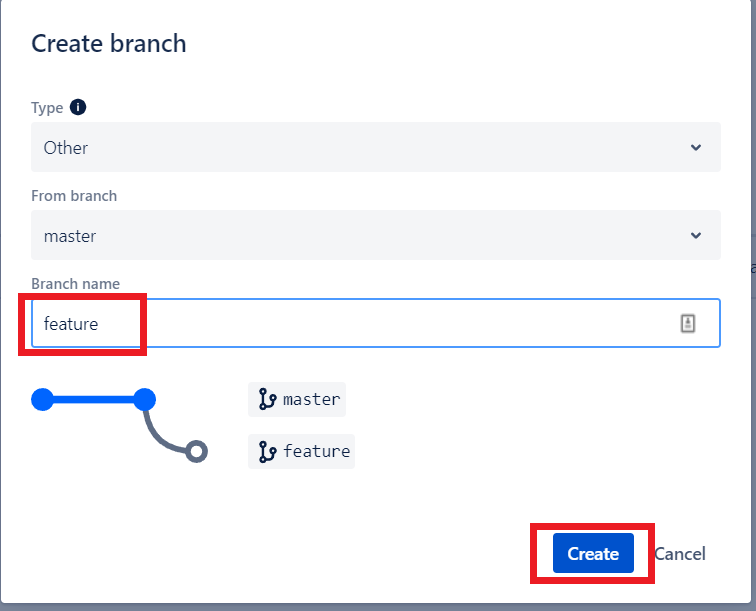
- In that repository create a branch called feature from master branch.
- In VS Code editor open terminal and use git clone command to clone the repository to your local machine. Then get in the repository folder.

Then use git checkout command to create a new branch on the local called feature. And you have automatically entered in that feature branch.

Write a code to Create EC2 Instance
In the repository folder create a file as main.tf. Copy the below code and paste it in main.tf file.
##################### PROVIDER ###############################
provider "aws" {
  access_key = var.access_key
  secret_key = var.secret_key
  region     = "us-east-1"
}
###################### LOCALS ###############################
locals {
  common_tags = {
    project     = "Test"
    environment = terraform.workspace
  }
  name_prefix    = "${var.name}-${terraform.workspace}"
}
################### EC2 INSTANCE ##############################
resource "aws_instance" "test" {
  count         = var.instance_count[terraform.workspace]
  ami           = "ami-052efd3df9dad4825"
  instance_type = var.instance_type[terraform.workspace]
  tags = merge(local.common_tags, {
    Name = "${local.name_prefix}-${count.index}"
  })
}
- Using this terraform file, we can create an EC2 Instance.
- In locals block we can give a common value for all the resources that we created from this code.
- For the environment section we use a variable terraform.workspace, which is take the value of the name of the terraform workspace.
- In the resource block, we use two variables for count and instance_type section. For these two values, we will give values in another file called terraform.tfvars.
- Create other 2 files called variables.tf and terraform.tfvars and paste the below codes to their respective files.
############### VARIABLES ###################
variable "access_key" {
  type = string
}
variable "secret_key" {
  type = string
}
variable "name" {
  type = string
}
variable "instance_type" {
  type = map(string)
}
variable "instance_count" {
  type = map(number)
}
############## TFVARS ####################
instance_count = {
  "Dev"  = 1
  "Prod" = 2
}

instance_type = {
  "Dev"  = "t2.micro"
  "Prod" = "t3.small"
}
- The terraform.tfvars file is a file that contains default values for the variables that we referred in variables.tf file.
- Here we are going to use workspaces for differentiate the environments.
- For this we use a map function. So, for each section, we set key-value pairs. For Key section, enter the name of the workspaces that are we going to create like Dev and Prod.
- For value section under the instance_count, enter values for Dev and Prod for 1 & 2.
- Again, for the instance_type, enter the values as t2.micro and t3.small.
So, when we deploy this code on Dev workspace, it creates a single EC2 instance with t2.micro type. But when deploy it on Prod workspace, it creates 2 Instances with t3.small type. Now we are going to deploy it and test it, weather it works properly or not.
Just keep it in mind. We have to check this differences at the end of this session.
Push the Code to Bitbucket
- In VS code terminal type “git add *” command for getting ready to push all the code to the remote repository.
- Git commit command to give a commit message.
- Git push command to push the code to the feature branch in remote repository.
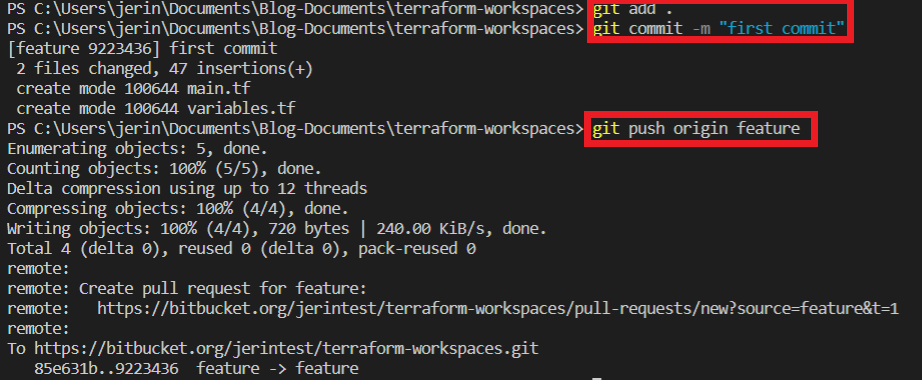
Once you push the code to the remote repository, then you have to setup terraform cloud with the Bitbucket for automation process.
Setup Terraform Workspace with Bitbucket
Create 2 Branches on Bitbucket
Now we are going to create 2 branches for connect with terraform workspaces.
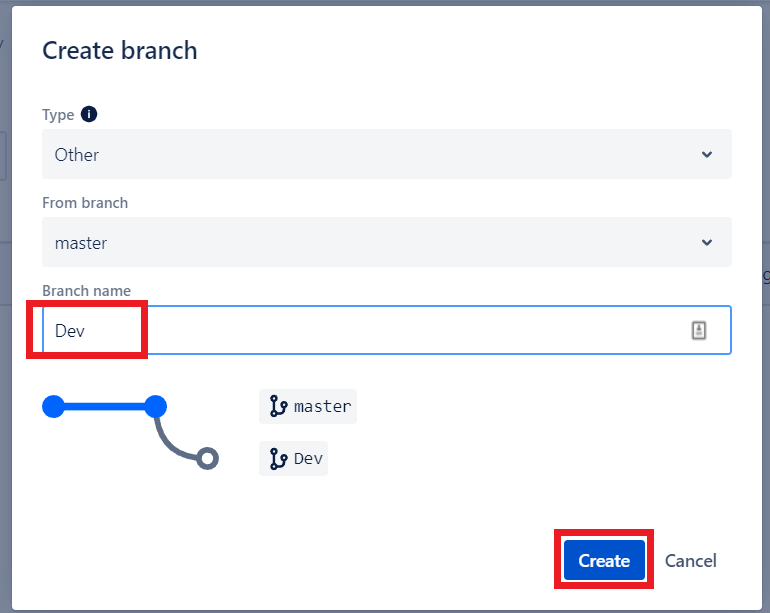
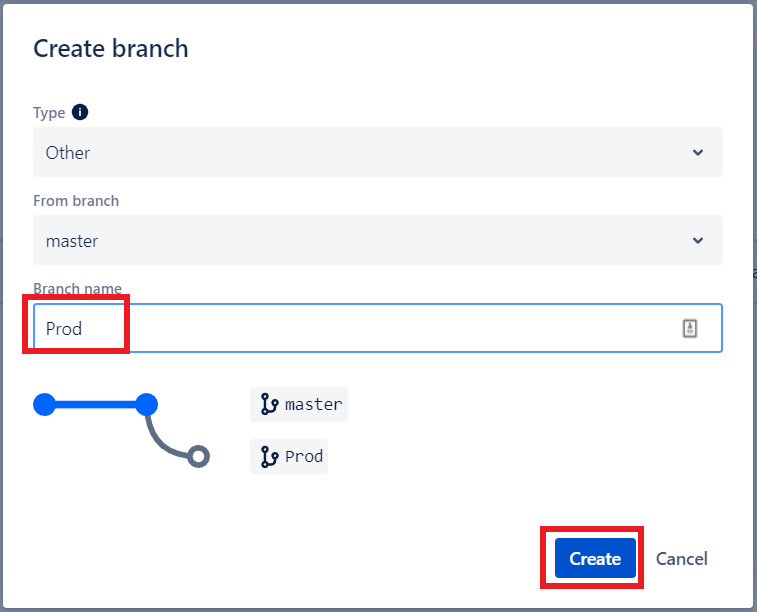
Create 2 branches in the repository called Dev and Prod from the master branch. These two branches represent as development and production environments.
Create 2 Workspaces on Terraform Cloud
Now go to your Terraform Cloud page. First, we are going to create Dev workspace. So, click the button New workspace for create workspaces.

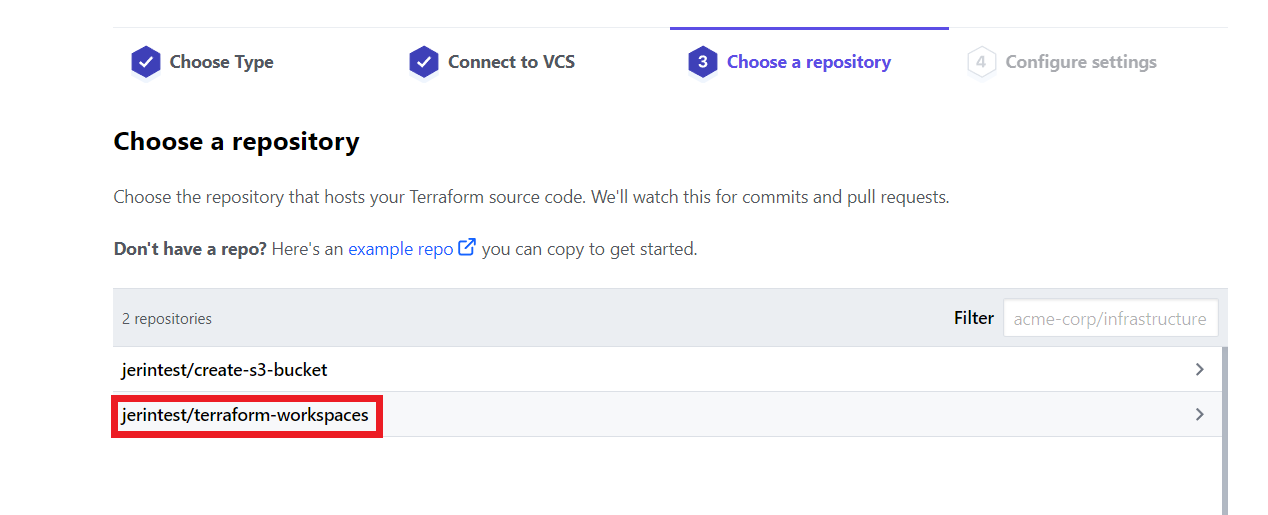 For Choose a repository section, choose the one which contains your terraform code.
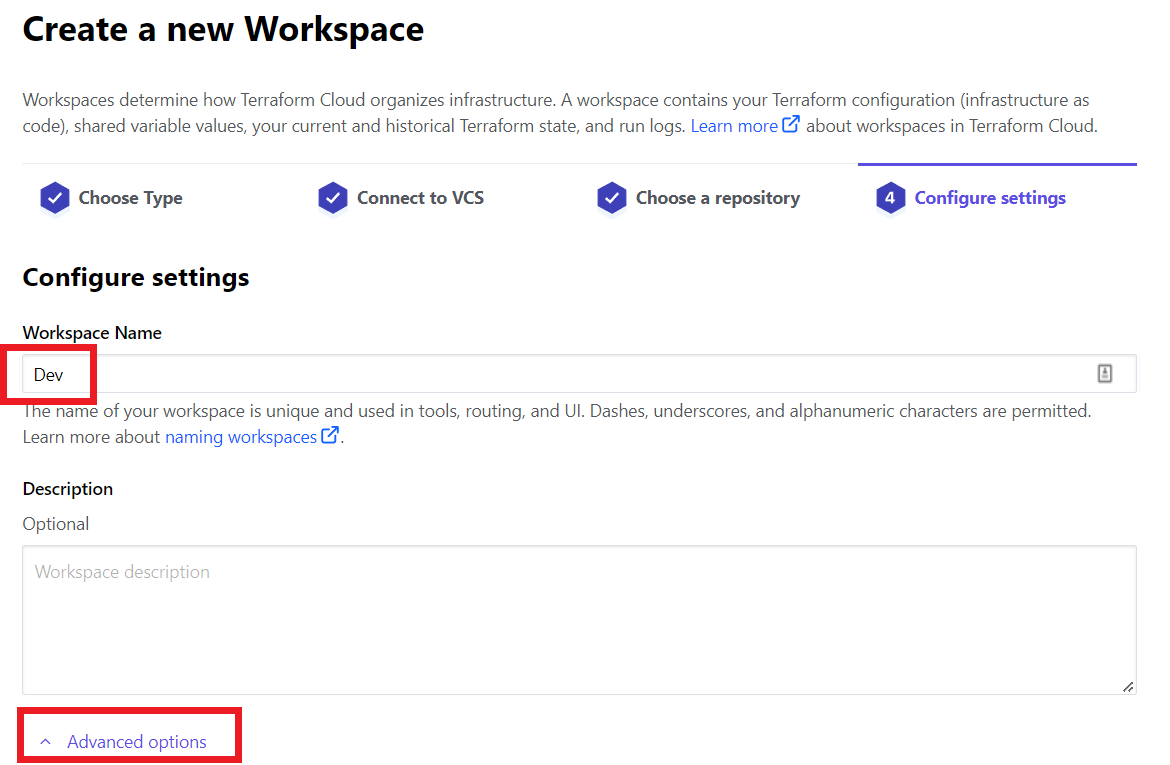
For workspace name enter Dev. This is the name that we mentioned in the code for workspace. This name will be replaced for terraform.workspace in the code, whenever we ran the code in this workspace.
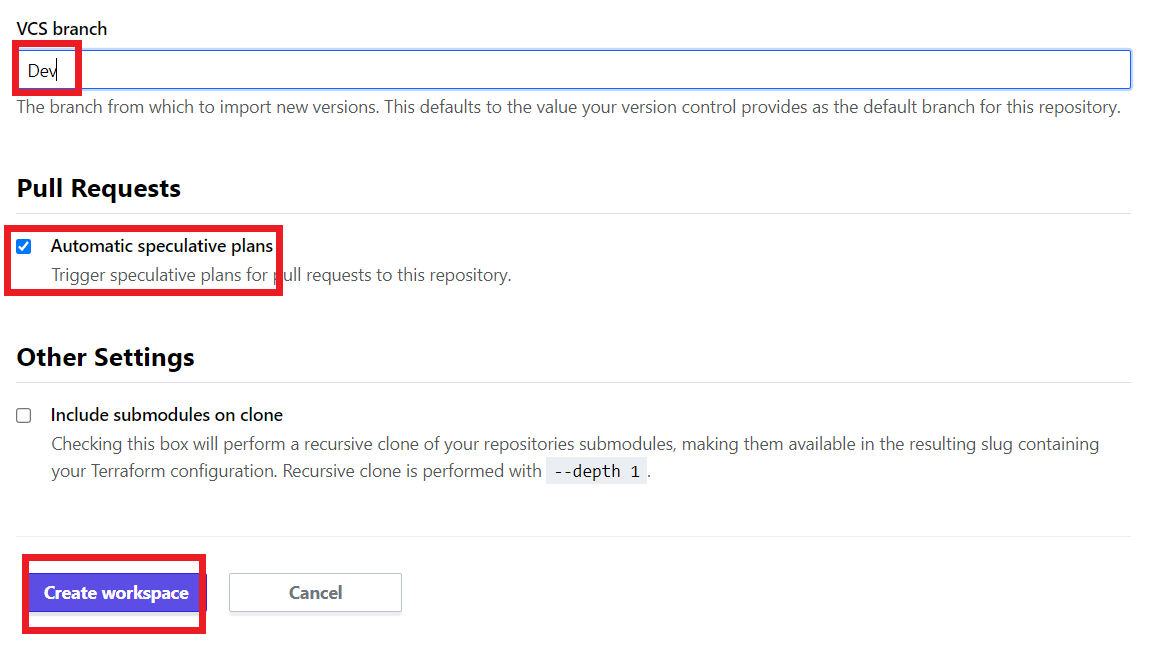
- For VCS branch enter the name of the branch that represents development environment. For this case I enter Dev, which I create in my Bitbucket repository.
- Check the little box under the Pull Requests section. So, whenever we merge a pull request on the Dev branch an automatic plan will be triggered on this workspace.
- Then click Create workspace button.
- Repeat the same process to create another workspace for Bitbucket branch Prod.
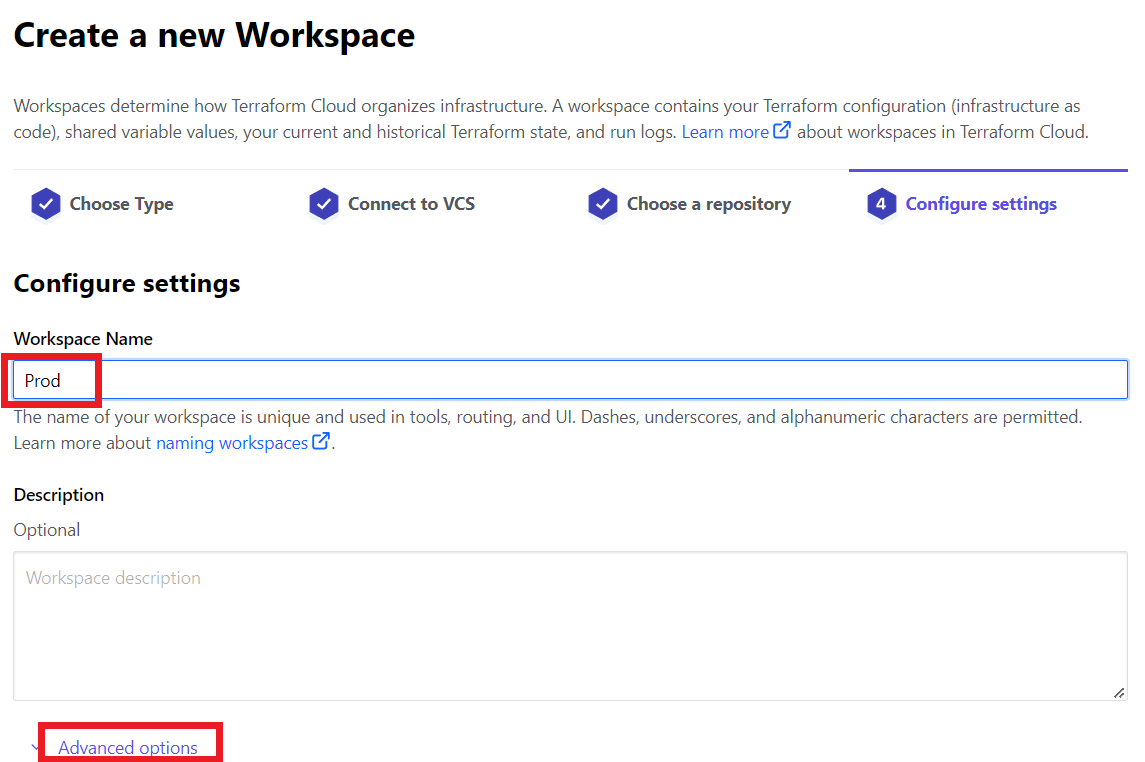
For the name enter Prod, which we mentioned in our code for workspace.
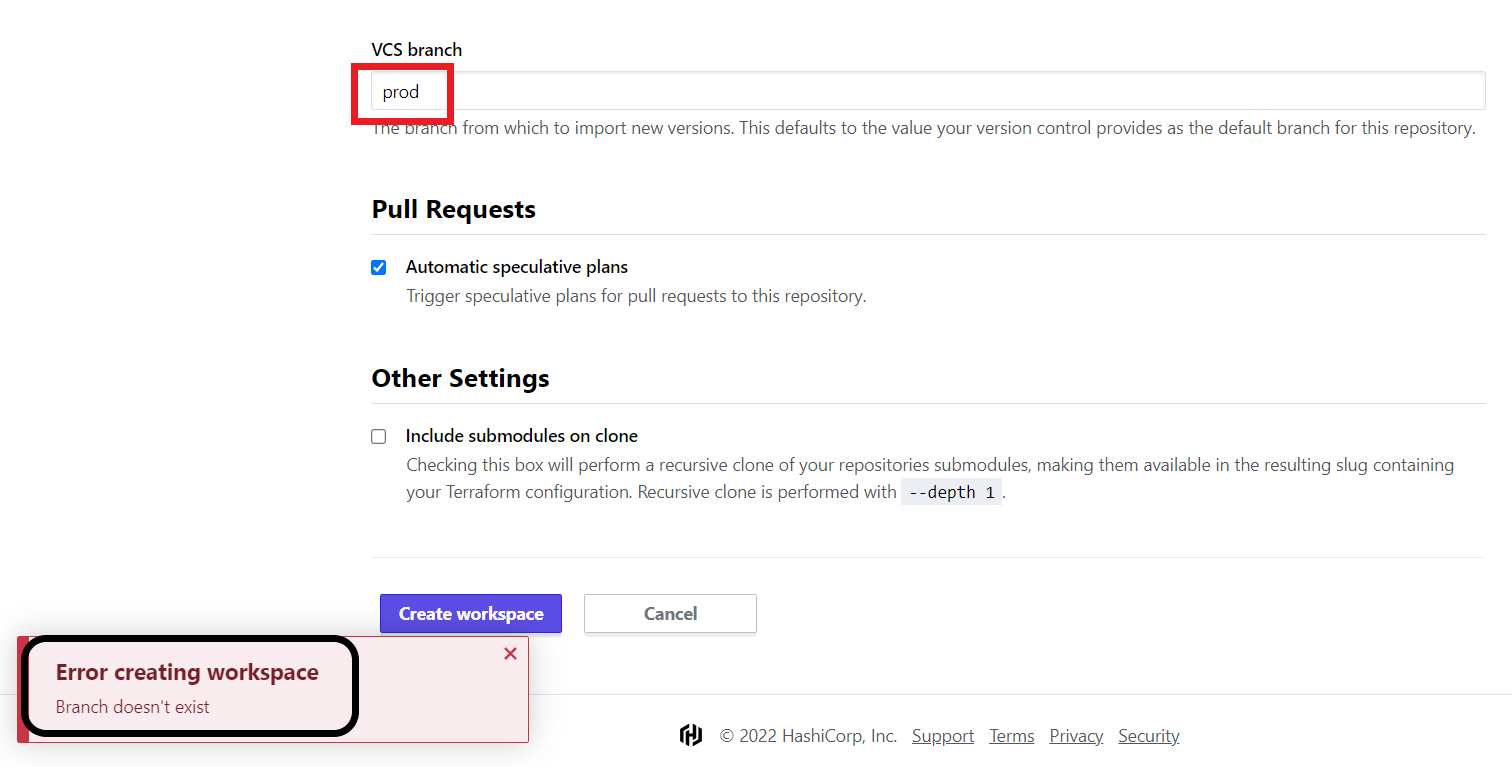
- Look at the error mentioned in the above picture, it throws error when click the create workspace. But why it throws error?
- You can see there for the VCS branch section; I have entered a wrong branch name. For “Prod” I entered “prod”. For this Terraform seeks a branch as prod in the Bitbucket repository and it didn’t identify any of the branch called prod. So, it can’t connect with Bitbucket.
- So, this section is a case sensitive. You have to enter the branch name correctly. And the branch should be in Bitbucket Repository that you have connected with Terraform Cloud.
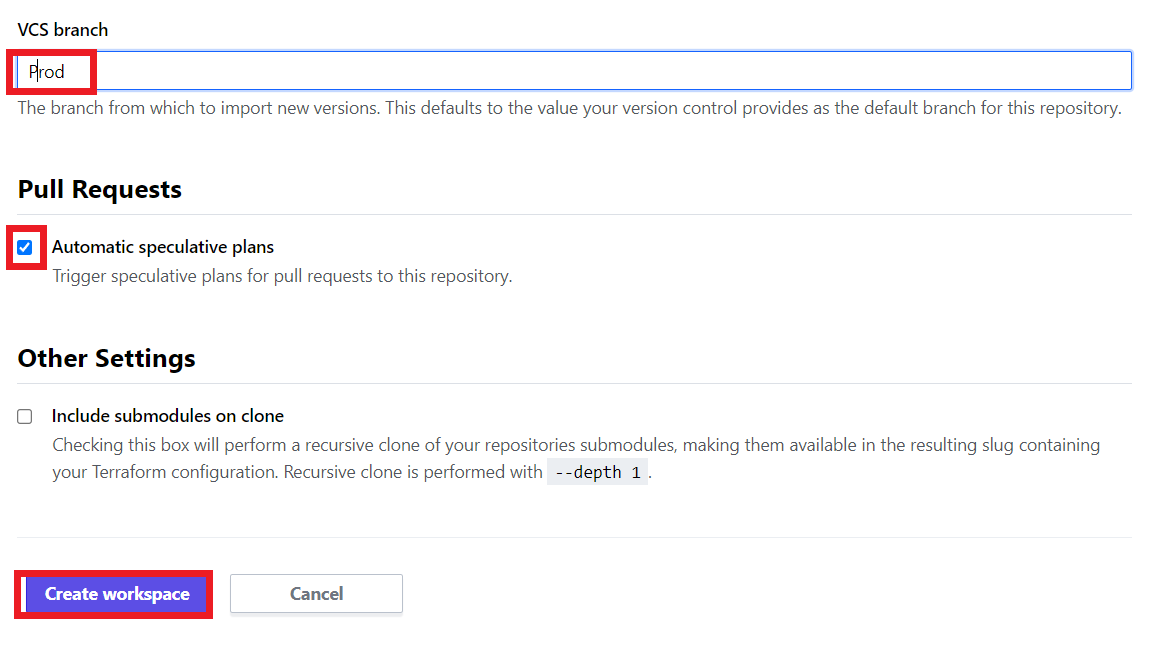
So, you have to enter a correct branch name Prod, and click Create workspace button. Now we are done for creating workspaces and connect them with their respective branches.
Configure Variable Sets
- In the terraform code we have set some variables. But we didn’t have any values for them. So now we are going to set variables in our terraform workspaces.
- We have 2 workspaces and we have to add variables in those 2 workspaces. But the values of the variables are same for all the workspaces.
- So, for setting variables in the all workspaces individually in their respective variables section. But alternatively, we can use variable set. This one is help us to use a single variable for multiple workspaces.
- You can see the below image, click the Settings button and again click variables sets, it navigates you to variables set page. Now click the create variable set button.
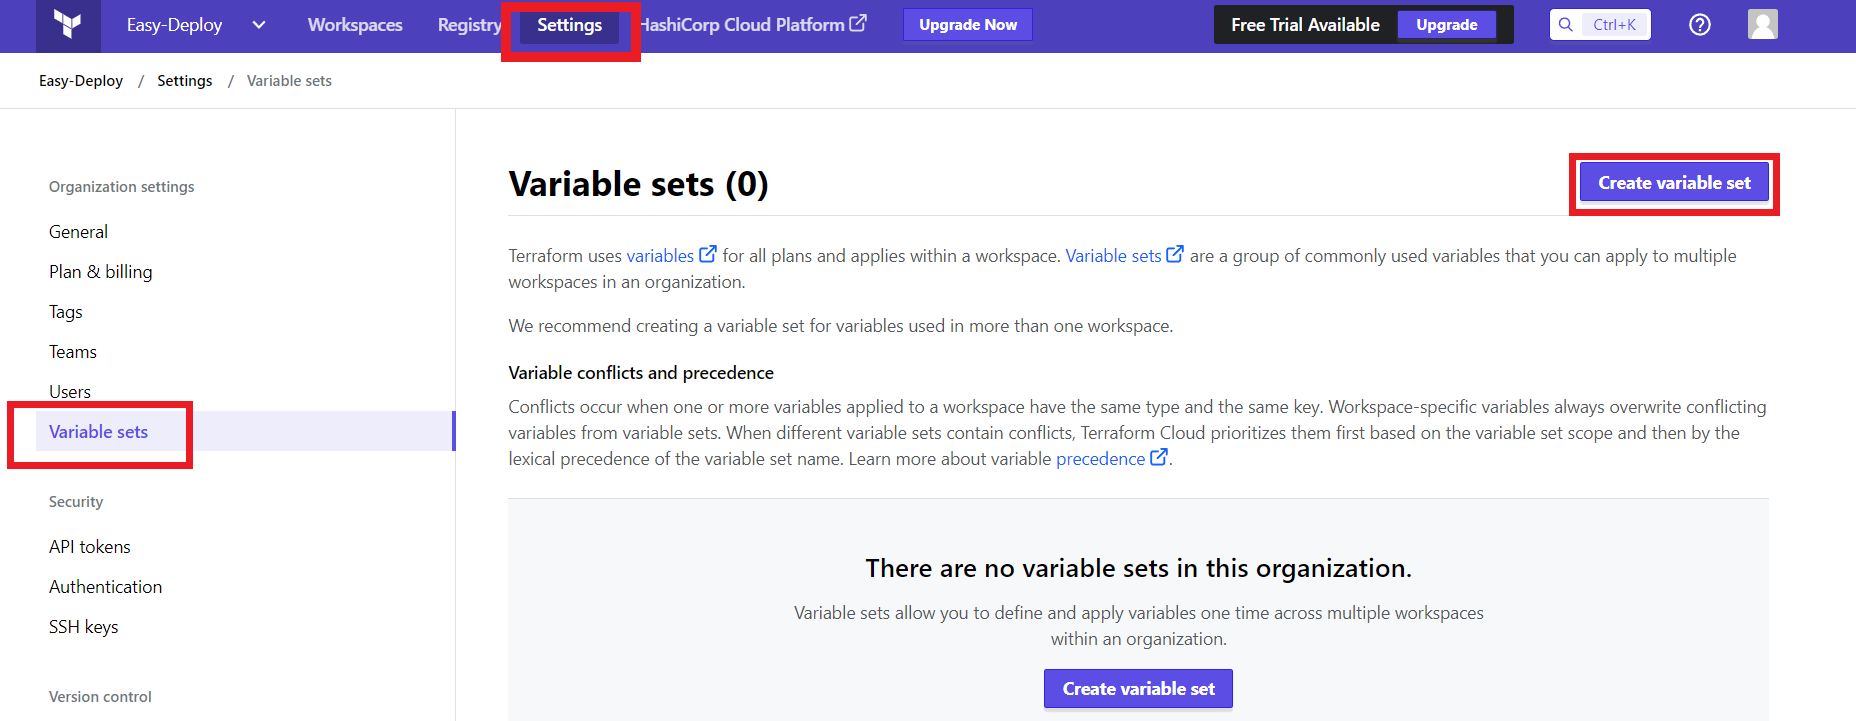

For workspaces section you can select weather Apply to all or Apply to specific. The first one is set the variables to all the workspaces that are present in the organization. The second one is helps us to select specific workspaces.
For the best practice always select the second one and choose the workspaces that we need to set the variables.
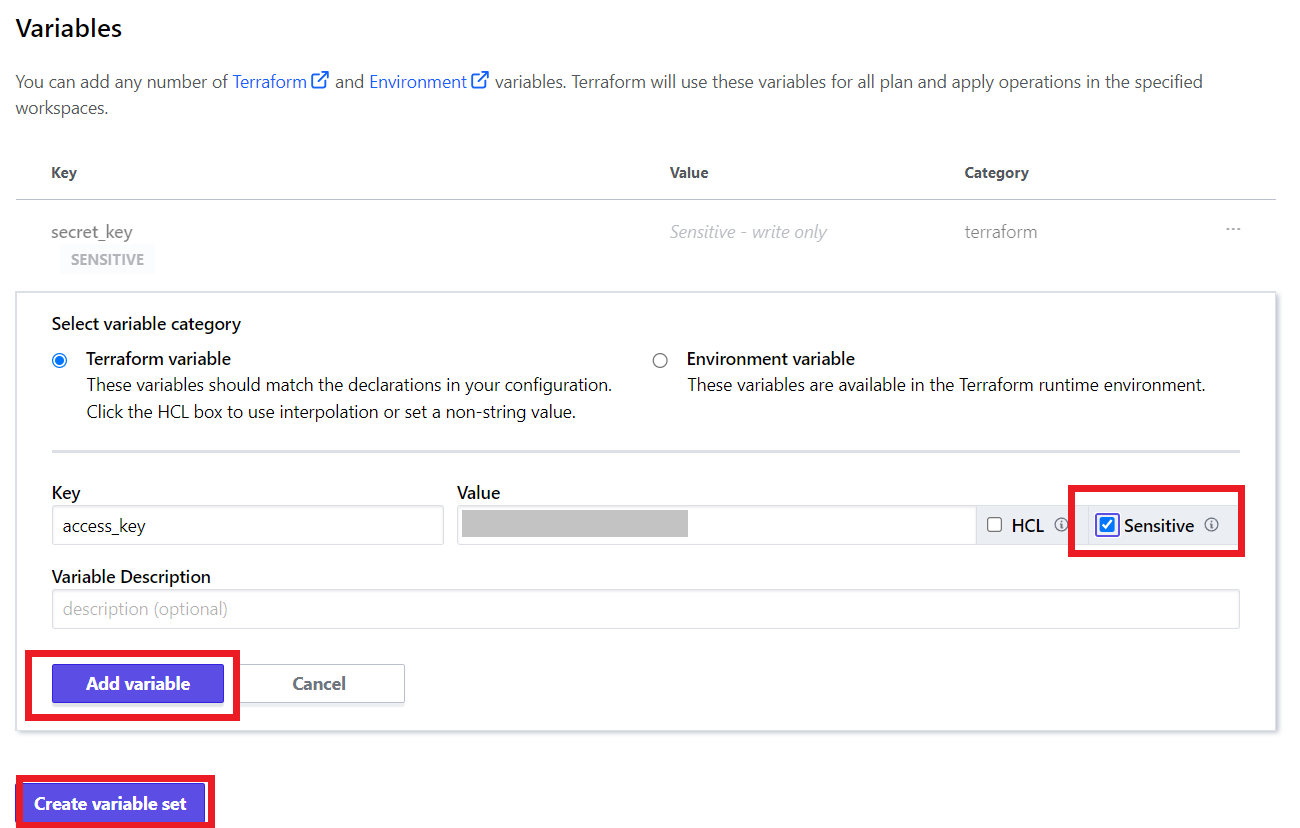
Click add variable button to add variables, and for case sensitive variables like access_key and secret_key, you have to check the box sensitive. Then only the sensitive variables won’t be showed anywhere, after you set the variables.
Once you done adding variables, then click the button Create variable set.
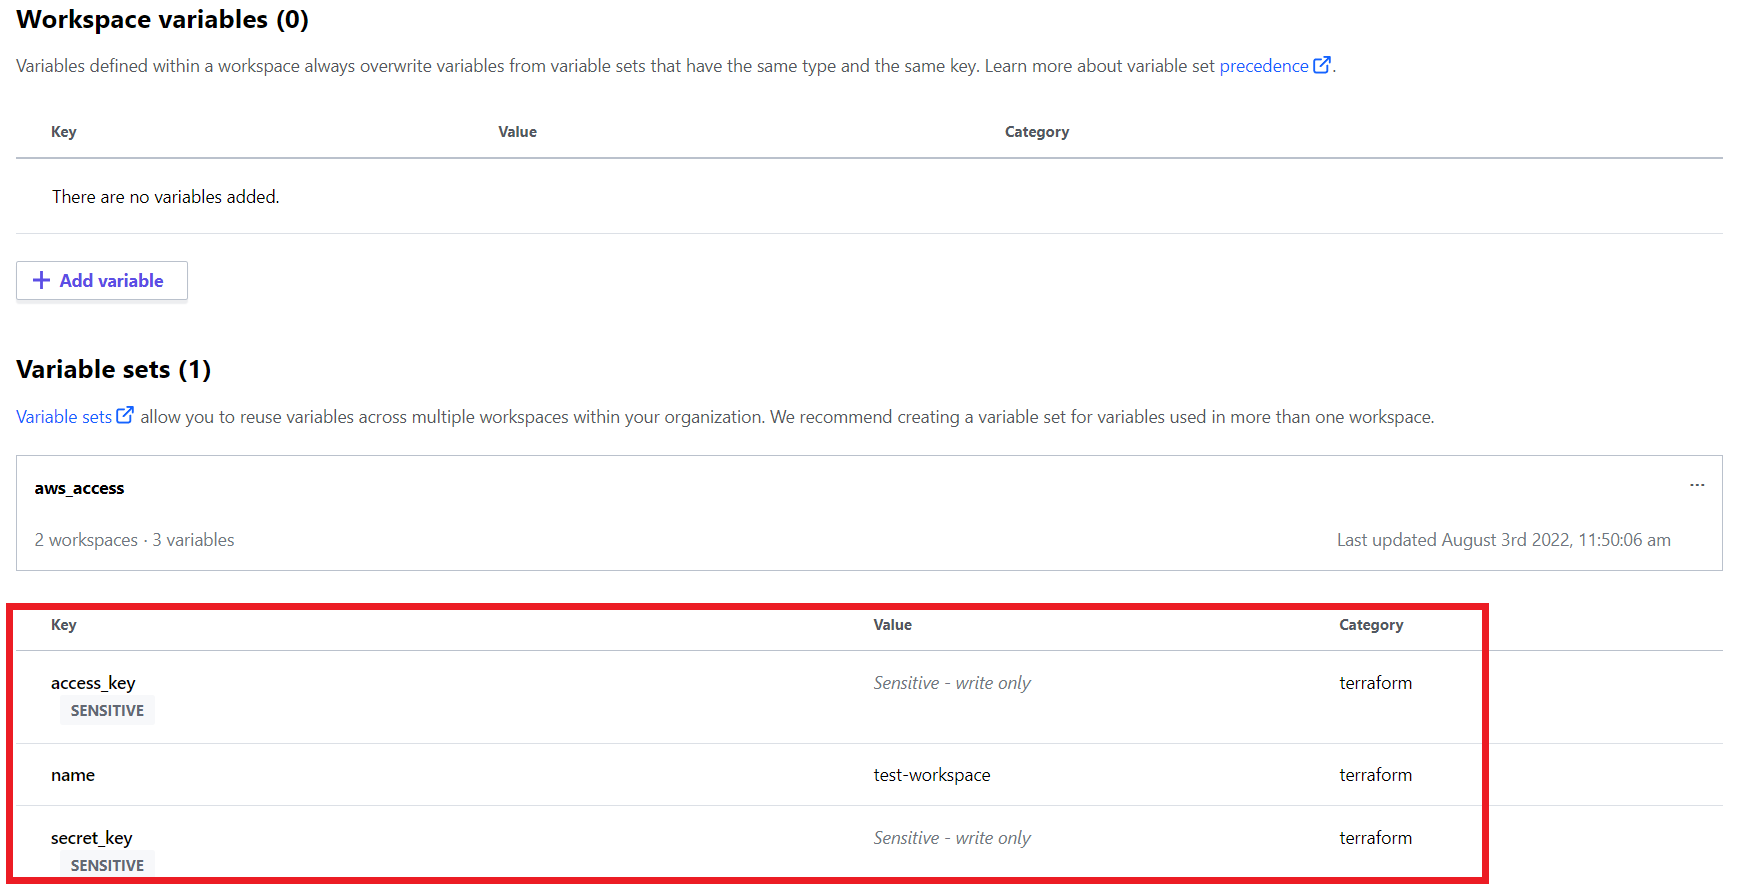
Now you can go to your any of the workspaces’ variables section, you can see the variables sets.
We are done all the setup. Now it’s time to deploy the code and see the magic happens. Let’s do it.
Merge Code and Deploy it on AWS
Merge from feature branch to Dev
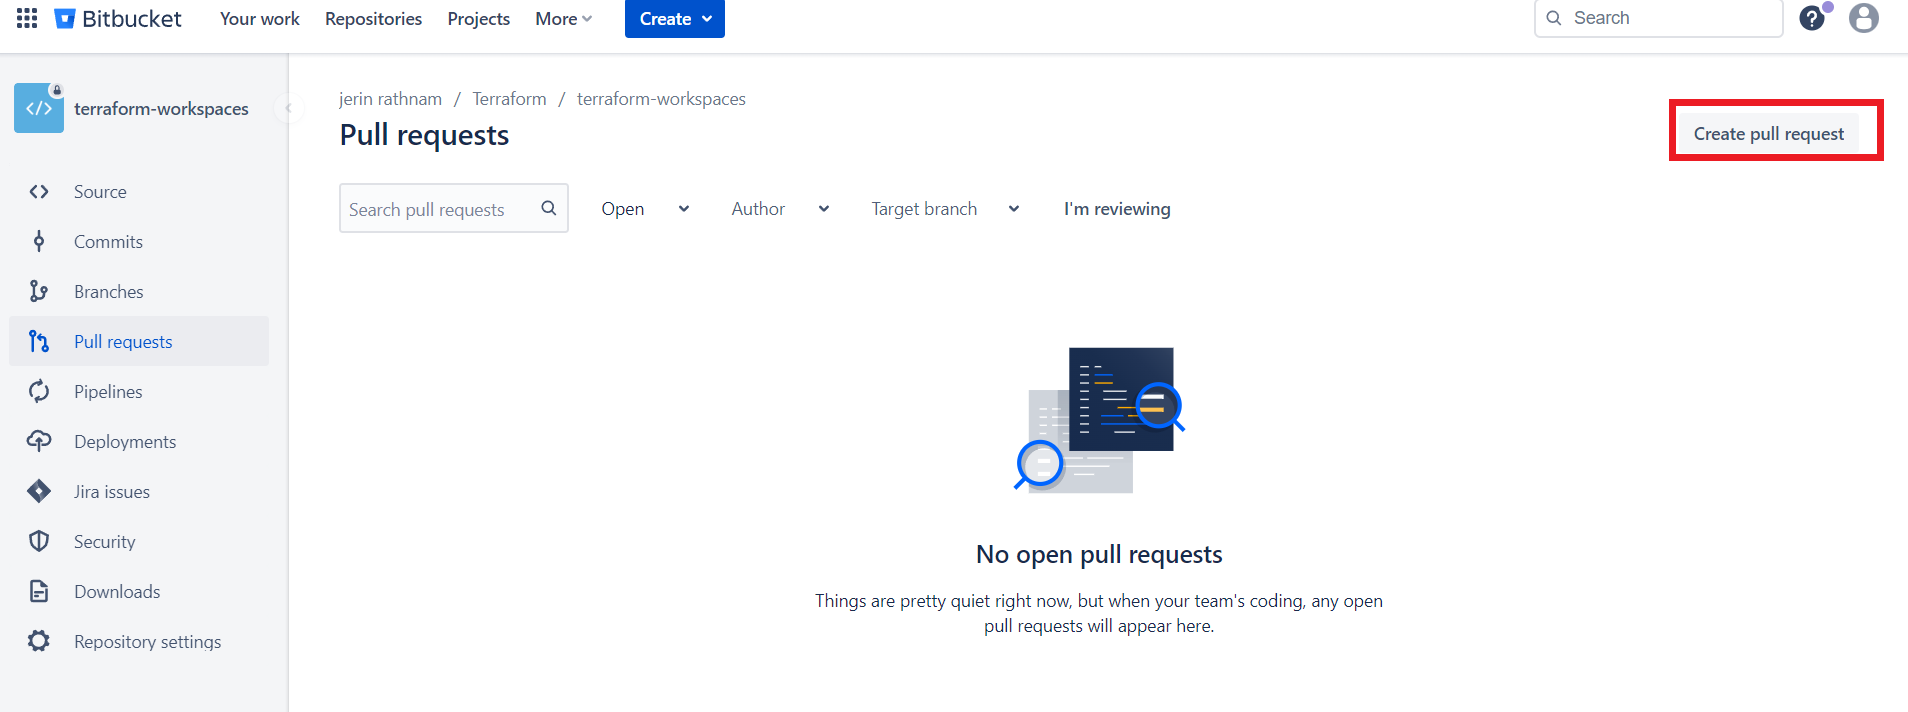
In your Bitbucket repository, go to the pull requests section and click Create pull request.
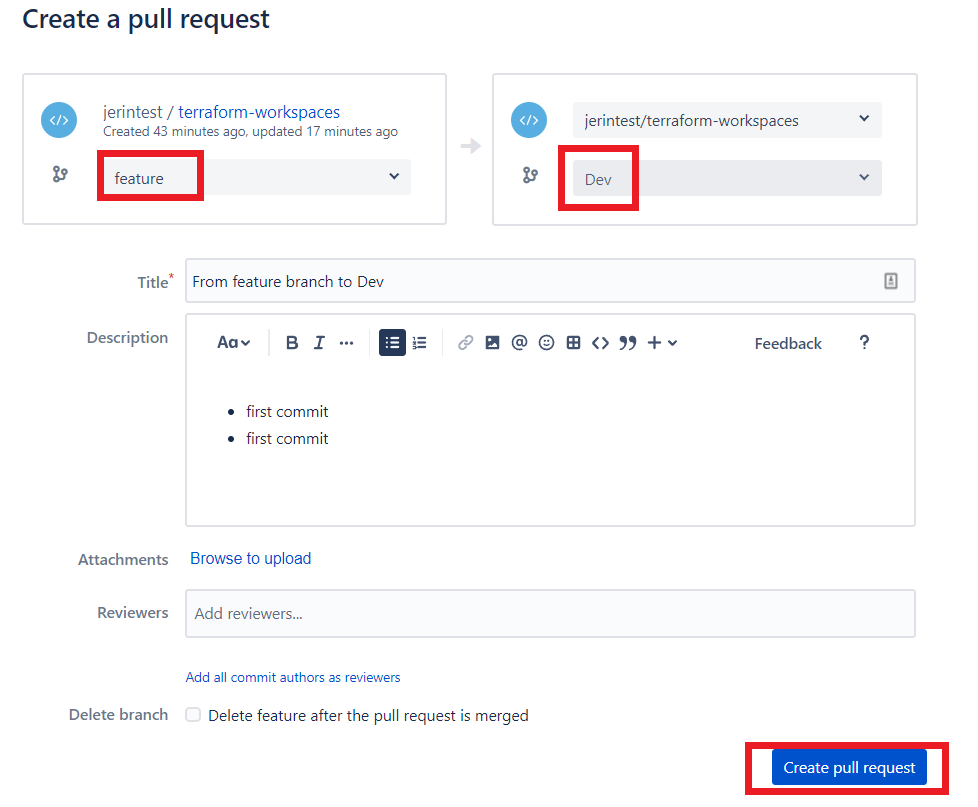
From branch section select feature branch and to branch section select Dev branch. Add a title for the pull request and click create pull request.
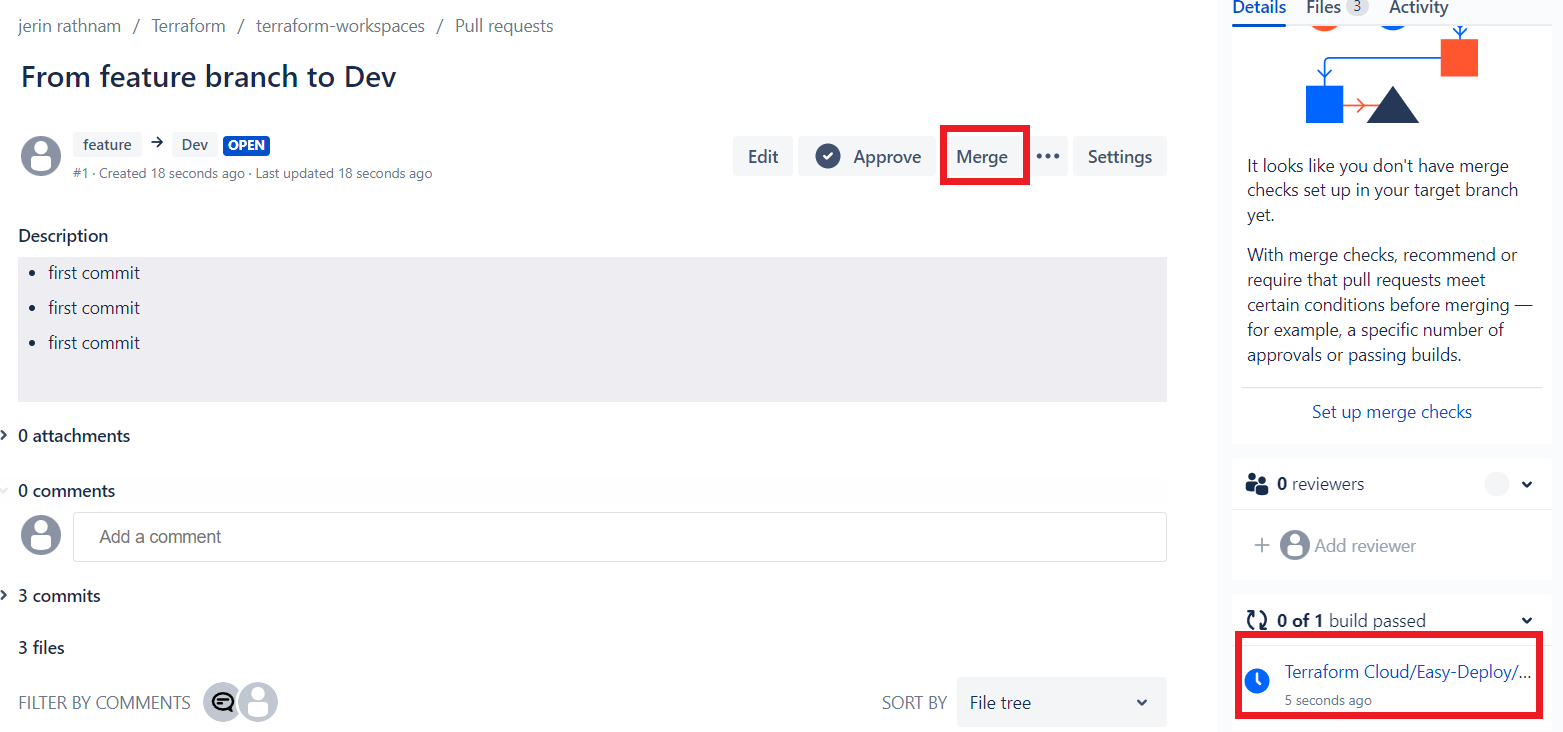
Now the pull request is in the pending stage. In right side below there is a link shows for terraform cloud, which triggers a plan for the code on a terraform workspace. Click the link It will redirect you to that Dev workspace.
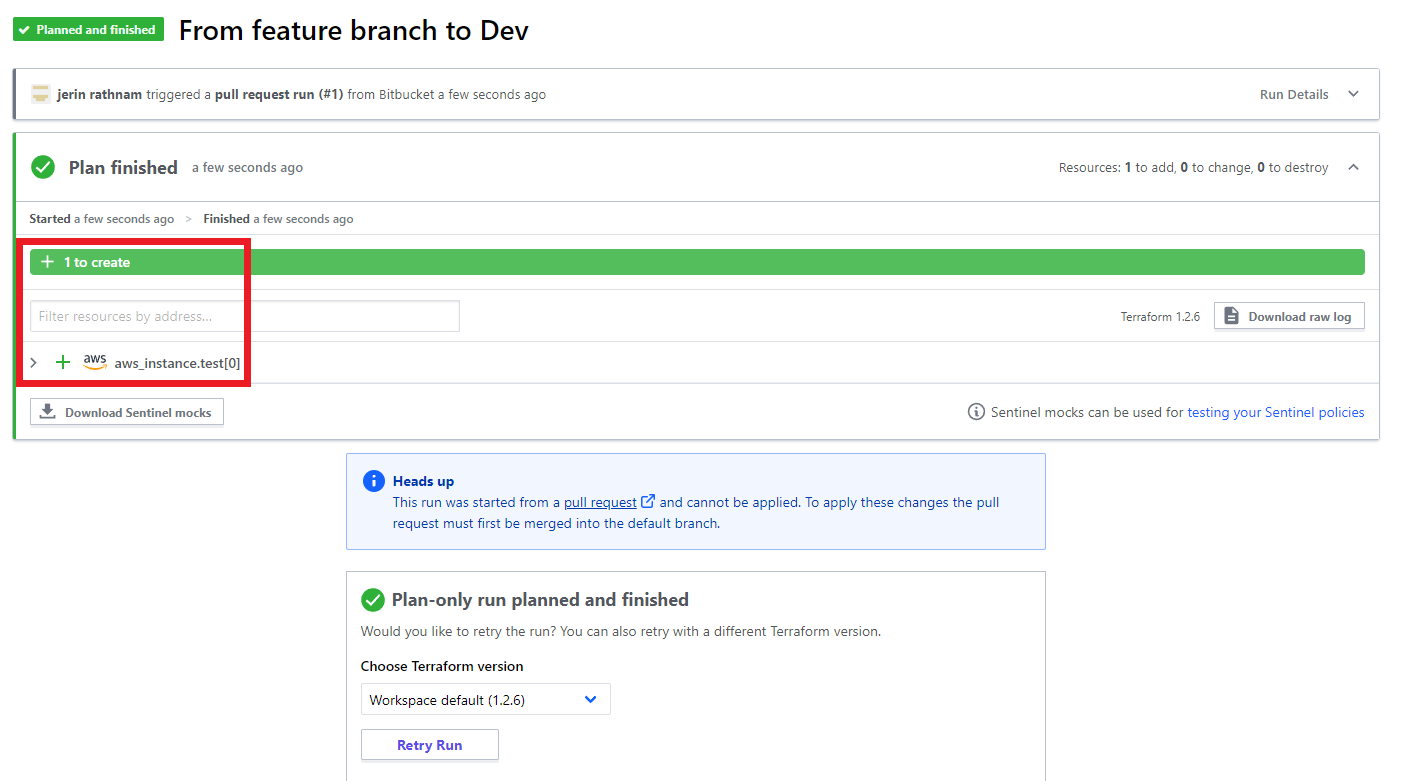
And you can see there will be a run occurs for a plan and it is successfully finished. It shows it is going to create an Ec2 Instance.
Now go to the previous page and click the Merge Button, to merge the feature branch to Dev.
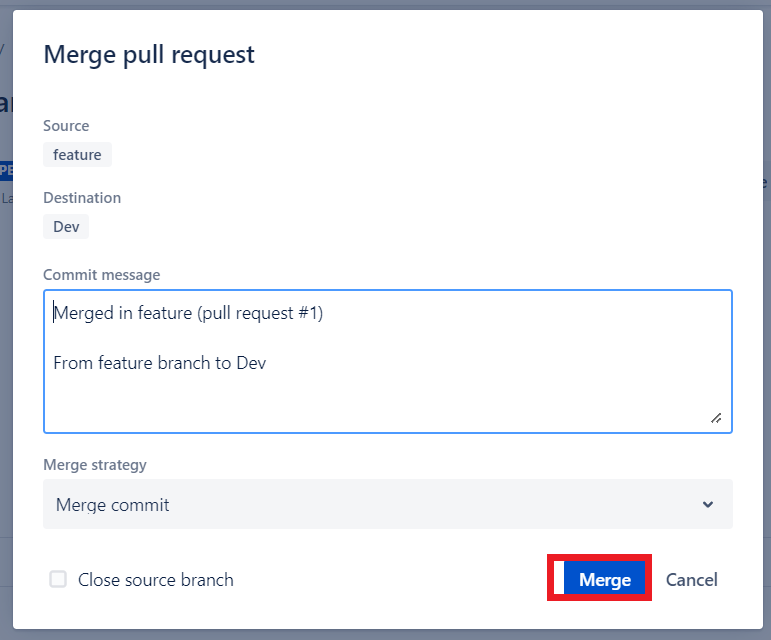
After the merge completed, you can see a plan triggers on the terraform workspace called Dev.

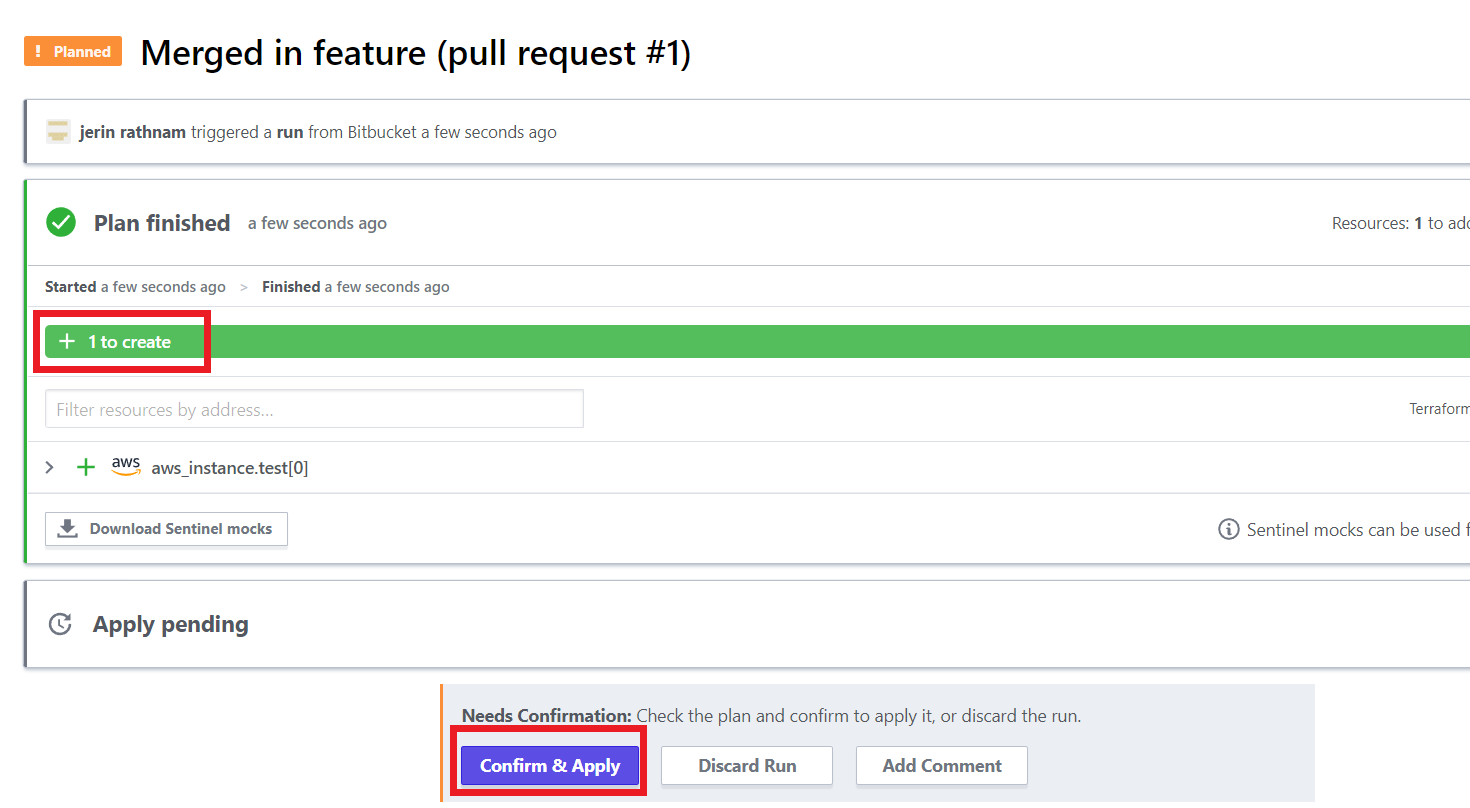
Once it finishes the plan, it needs a confirmation for apply the code. Click the Confirm & Apply button.
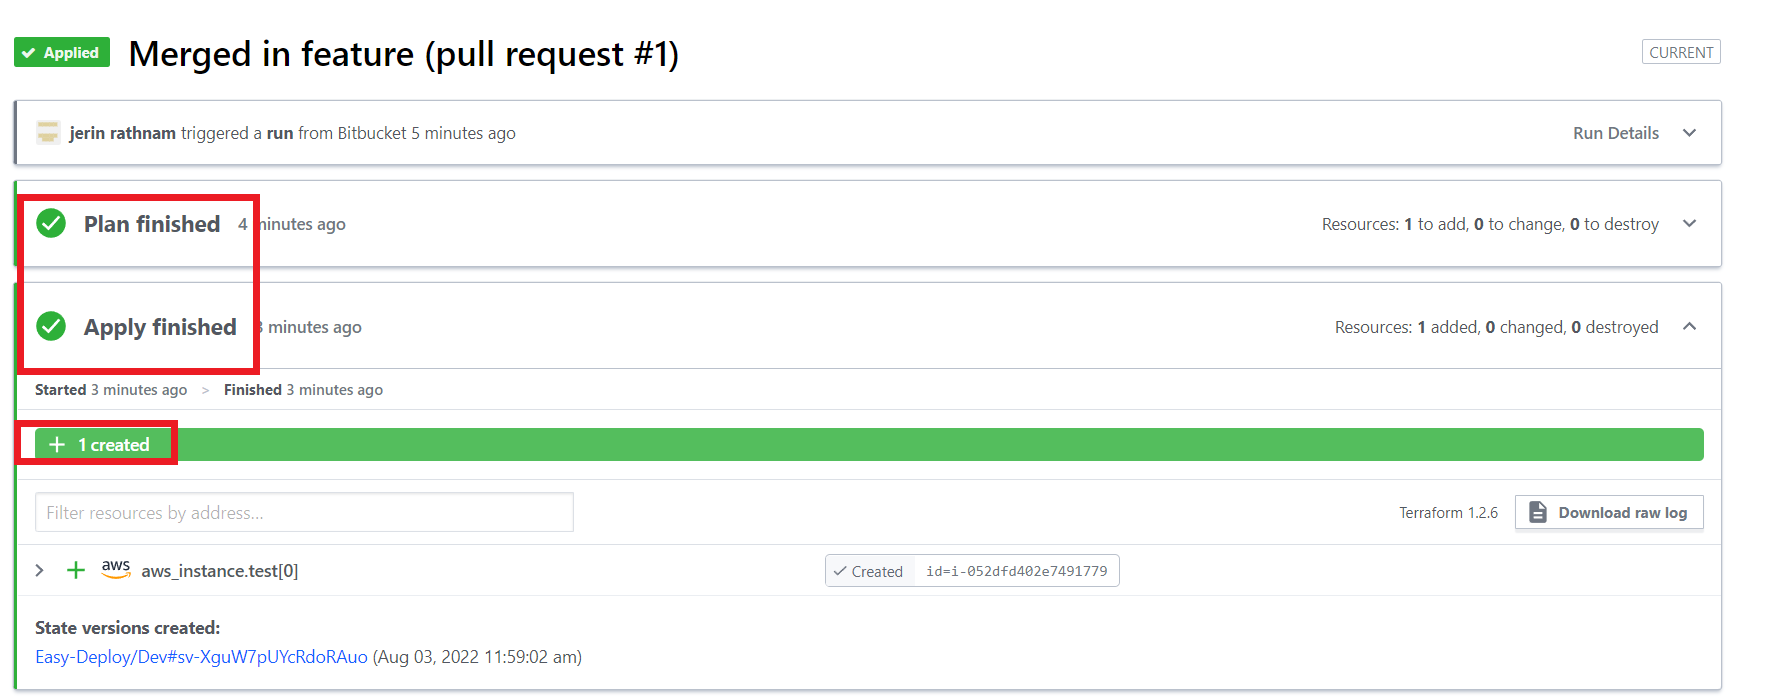
After the apply is successfully finished, go to your AWS account to see the EC2 instance is created Perfectly or not.

- You can see the Instance type is t2.micro, which we mentioned in the code for Dev workspace, the type of the instance will be t2.micro and the count of the instance is 1.So here the Instance in only one and the type also set perfectly.
- And you need check another one in tags section. Select the Instance and clicks Tags.
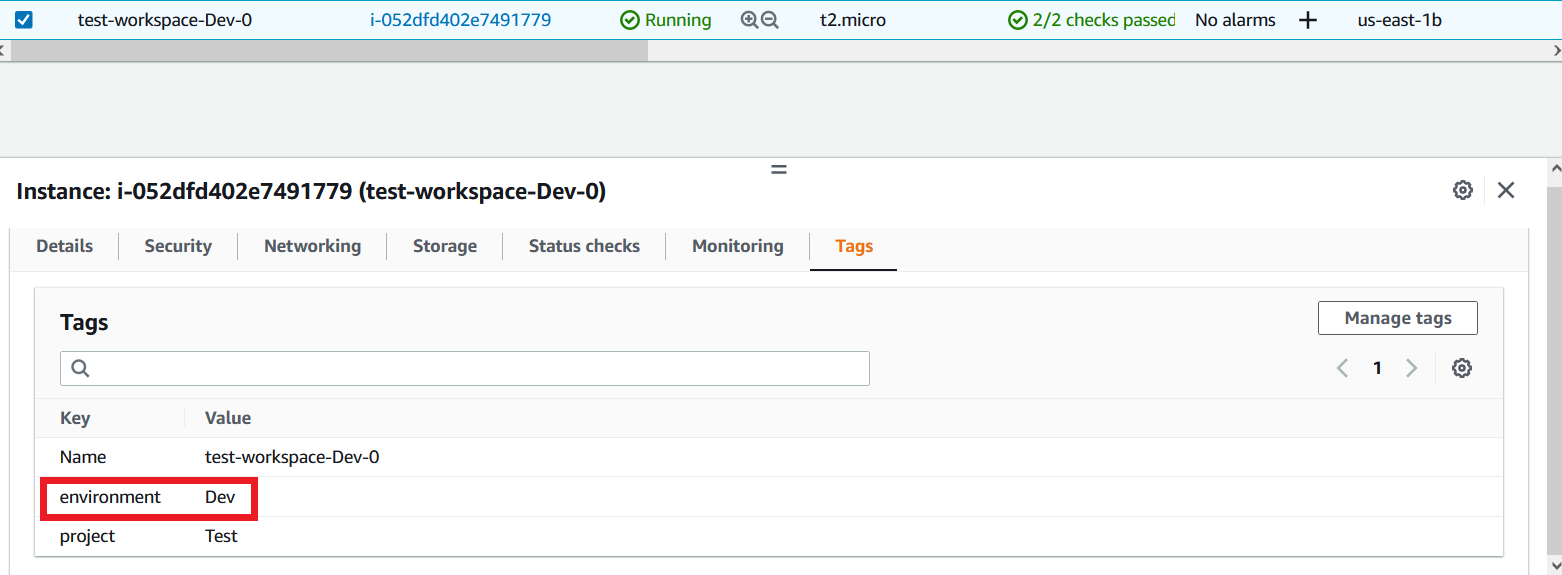
As you saw the above image, in the Tags section, for the Key environment it gives a value Dev, which is the name of the workspace, where the code is run. These values will be automatically applied based on the workspaces. Repeat the same process for Prod workspace.
Merge from Dev branch to Prod
Create a pull request from Dev branch to Prod.
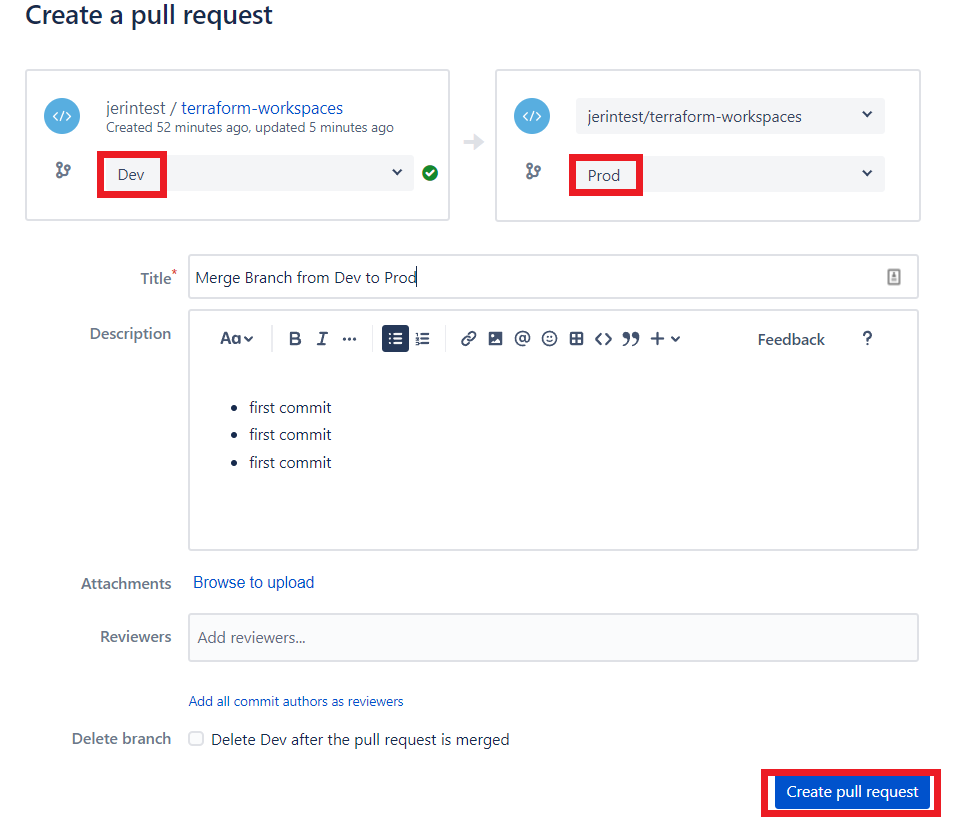
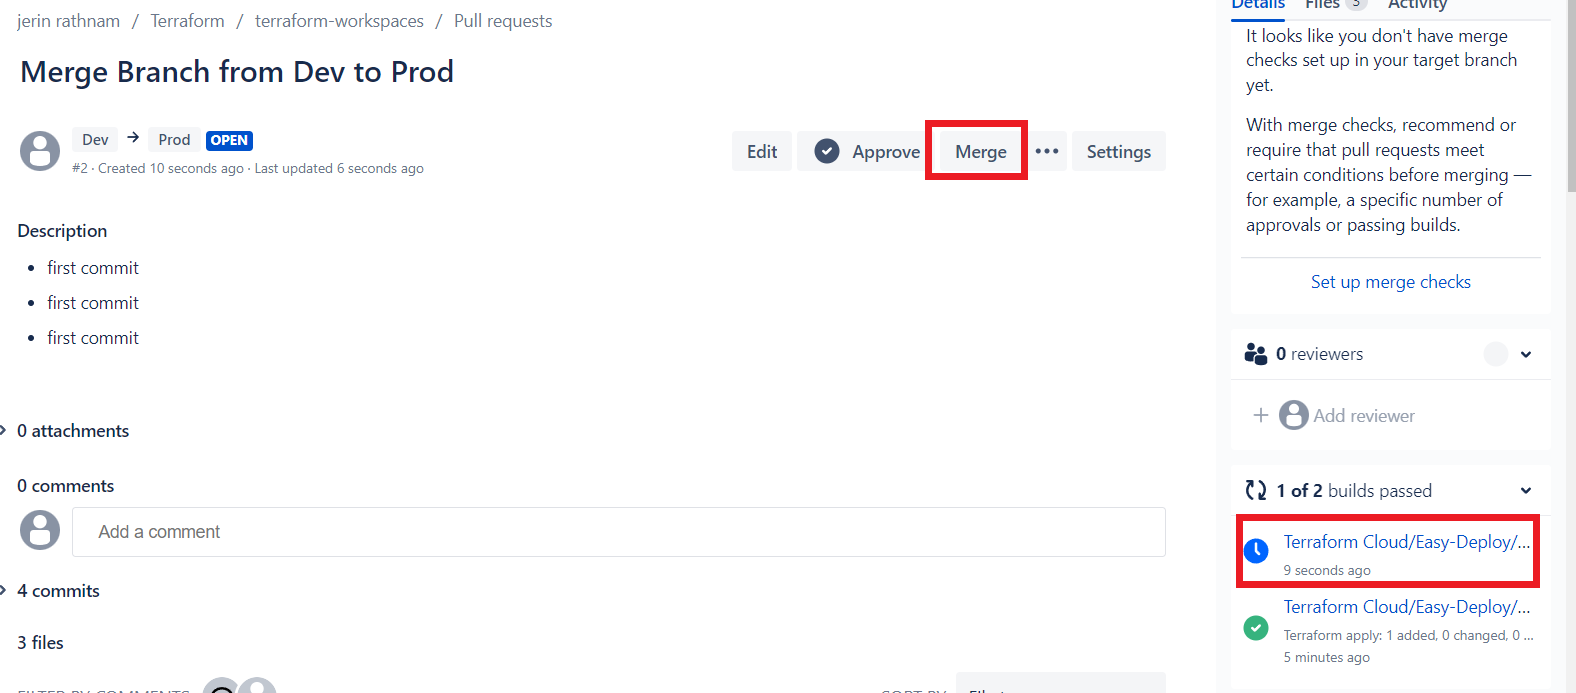
You will able see the below right corner, a link for Terraform cloud. Click it and check the plan is success or not.
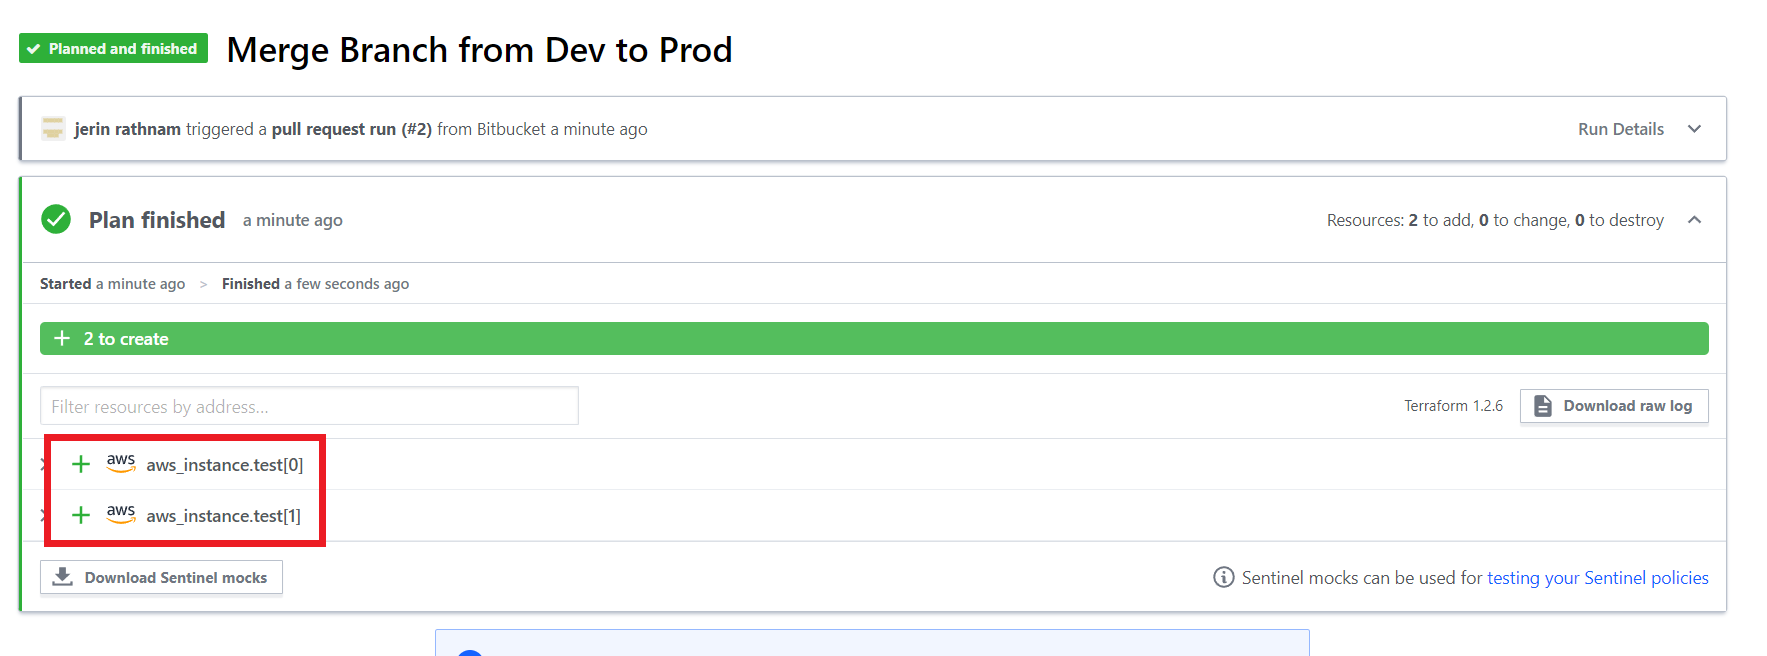
In this plan It says there will be 2 EC2 instances are going to created. Because We mentioned in the code for count of the instance is 2 for Prod workspace.
So, complete the merge request in the Bitbucket repository, a plan will be triggered automatically on the Prod workspace.

Once the plan finished, apply the code and wait for apply finished.
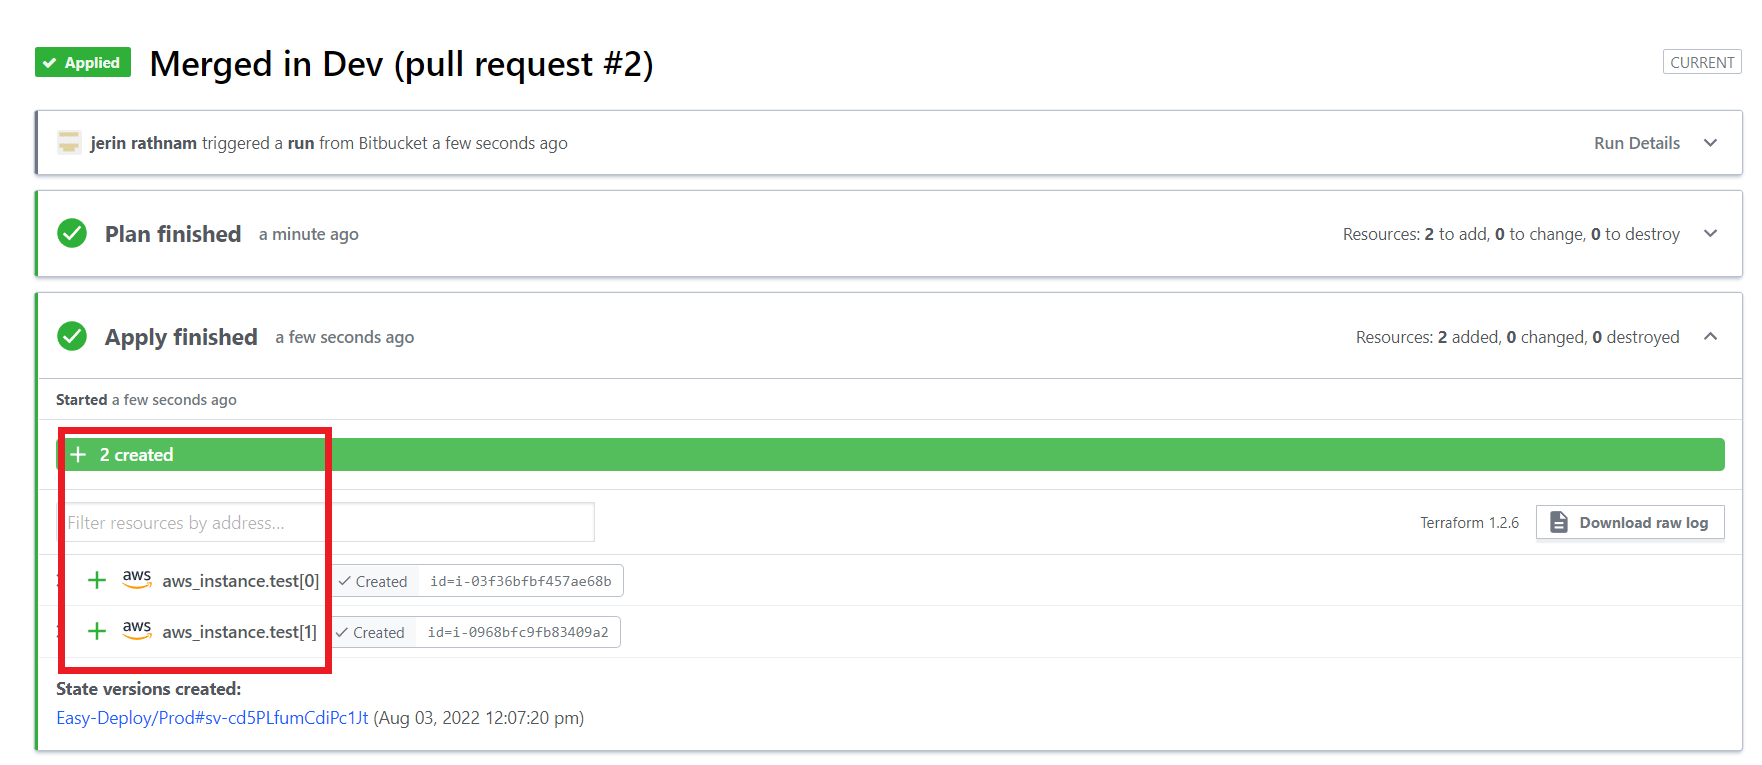
Once it’s done you can check the AWS Cloud for creation of 2 EC2 Instances.

- You can see there will be extra 2 EC2 instances are added in the name test-workspace-Prod-0 and 1.
- The type of the 2 Prod Instances also has t3.small, which we refer in terraform code for Prod workspace.
- Check the Tags of the Instances is set to Prod for environment.
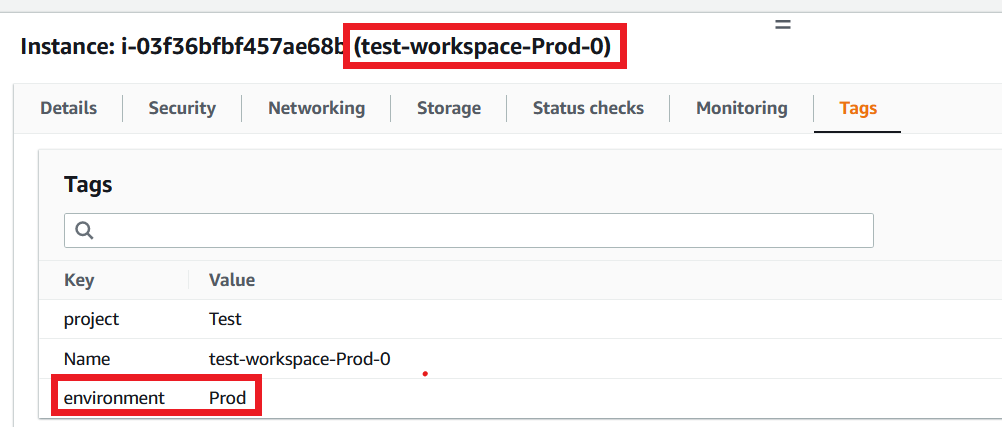
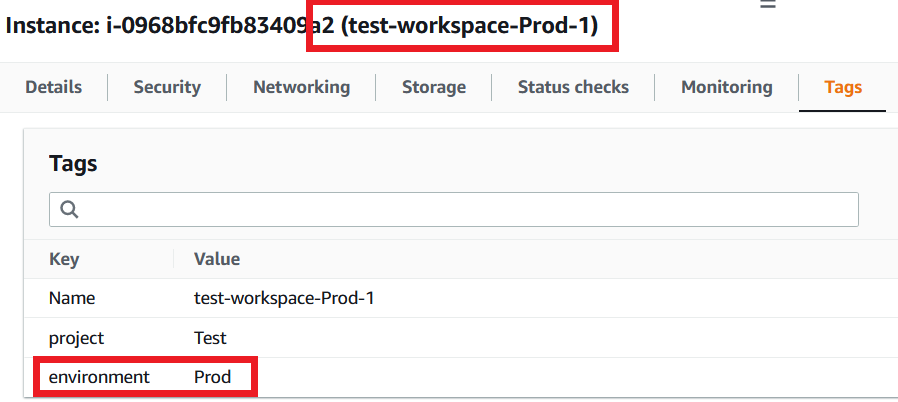
Yes, all the 2 Instances are containing the Tags value Prod for Key environment.
So, yeah. This is all I want to cover you about the workspaces on terraform cloud.
State Files in Terraform Cloud Workspaces
There is one more thing I want to show you. When we are working with Terraform Cloud, terraform stores its state file on cloud not local. You can see the State files on all of the workspaces.

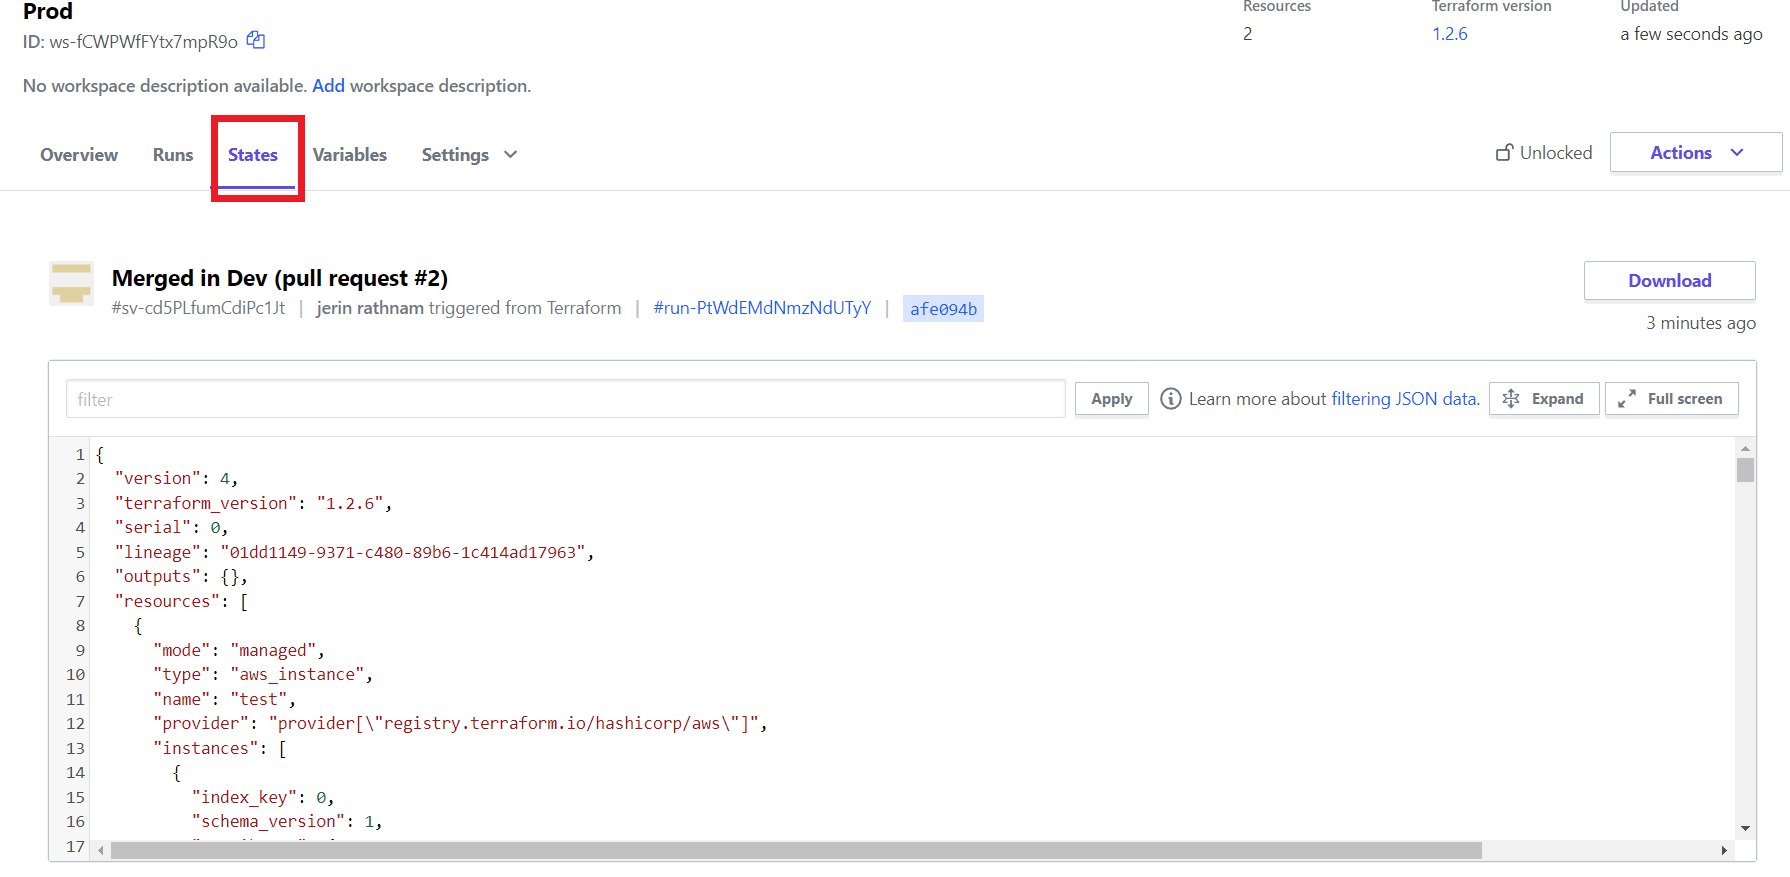
You can see the State Files on the state section for every workspace that you have created . These state files are created from the same code, but they are isolated from one another. That’s why terraform workspace is a very handy feature for multiple environment use cases.



Hi Jerin,
I enjoyed your article on terraform cloud and deploying to multiple environments. I used this article as a guide for setting up a couple environments that we have. I have a question for you which may have not ran across before if you have time. 🙂
In our case we have a dev environment and prod environment as described in your article. We have used a different variable set for each workspace for the purposes of account and credential information. This seems to work fine.
What I don’t understand with Terraform Cloud and can’t find any documentation around is how the terraform block works with different workspaces. I’m specifically talking about the workspaces block within the cloud block. Is this ignored during run if it’s ran via remote?
Using your example, I am assuming at the top of you main.tf file you have something that looks like this:
terraform {
required_version = “>= 1.1.1”
cloud {
organization = “xyz_org”
workspaces {
name = “dev”
}
}
}
If you are using the same main.tf file in both your dev and prod workspaces and your main.tf file has the workspace defined as dev. I am guessing this is ignored when a run executes in your prod workspace. Is that true? That seems to be what I am seeing.
Thanks writing for the article and the response in advance!
Hi Bryan,
Thanks for asking this. It seems you have great knowledge of Terraform.
So, when you run terraform cloud remotely like using vcs providers, there is no need to configure terraform block with cloud block.
You can see my code which is mentioned as main.tf, that does not contain terraform block. Terraform block is needed if you run your code from your local like Terraform Cli and you want to connect with Terraform Cloud.
The below terraform block is for run terraform from CLI to Terraform Cloud.
terraform {
cloud {
organization = “my-org”
hostname = “app.terraform.io”
workspaces {
tags = [“dev”, “prod”]
# name = “dev”
}
}
}
This is the terraform block with cloud block configurations. And inside the workspace block, I have 2 arguments. We can only use one of the arguments either ‘name’ or ‘dev’.
If you want to use your terraform code in a single workspace then you can use the ‘name’ argument. Otherwise, you can use ‘tags’ to mention multiple workspaces.
As you mentioned in your reply, if your code has ‘name’ = ‘dev’, then it only runs in the dev workspace.
I think I am fulfilled with your question. If you need more clarification, any time you can ask me. I am ready to help you.
And I am pretty sure I will create a blog about terraform backend types. That will help you to get a better understanding of the terraform block.
Thanks,
Jerin