In our previous blog, we could see how to upgrade the RDS MySQL version to the latest version with zero downtime using AWS DMS.
In this blog, we are going to discuss upgrading the Amazon Aurora PostgreSQL version from 10.21 to the latest version(for now 14.5) using DMS.
We just follow the same but little different procedure from the previous blog to complete this requirement.
Create Parameter Groups
Open your AWS console and search for RDS and click it.
On the left side of the RDS page, you can see parameter groups. Enter the section and Click Create parameter group button in the top right corner of the page.

- First, we have to create a parameter group for aurora PostgreSQL version 10 for an old version of the database.
- Choose the Parameter group family to aurora-postgresql10.
- Enter the Group name to cluster-aurora-postgresql10 or whatever you want to provide at your convenience.
- Then provide a description of the parameter group then click Create.

Now select the parameter group you just created, and click Parameter group actions -> Edit.

Search for the following parameters and change their values of them with the below values like the screenshots below.
- rds.logical_replication = 1
- wal_sender_timeout = 0
- rds.log_retention_period = 7200
- max_replication_slots = 20
- session_replication_role = replica


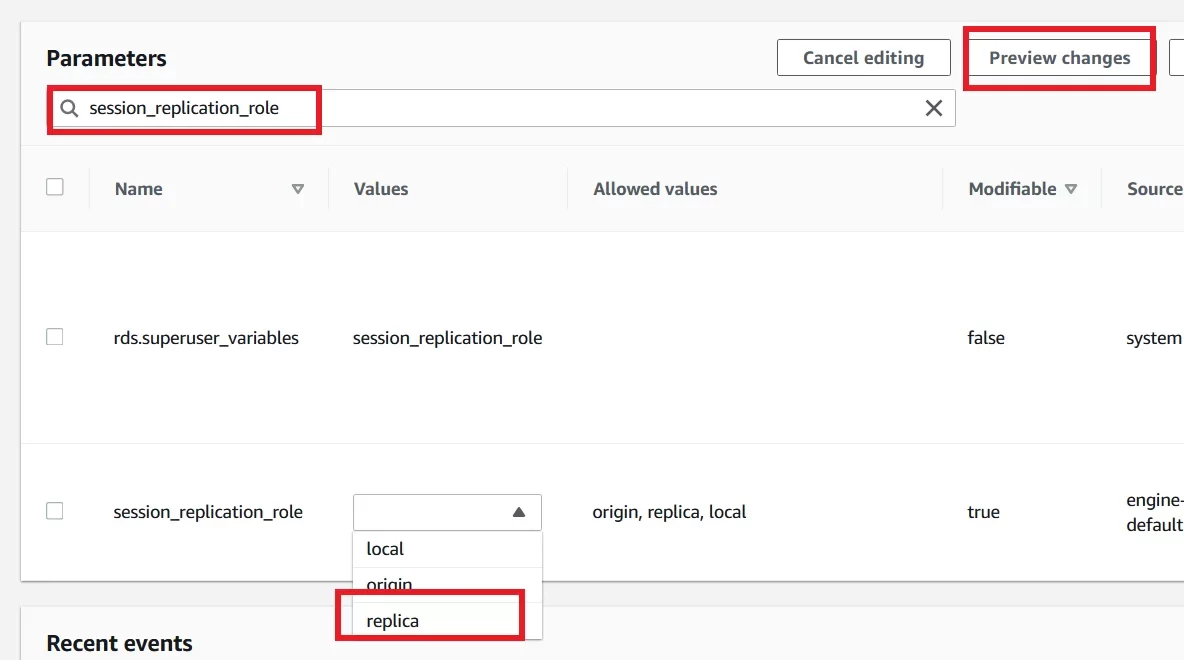
Once completed all changes in the parameters click the Preview changes button like the above picture to view the changes.
You can see the changes in the parameters, click Save changes.

Create another parameter group for Aurora PostgreSQL version 14 for the latest version.
- Choose the Parameter group family to aurora-postgresql14.
- Enter the Group name to cluster-aurora-postgresql14 or whatever you want to provide at your convenience.
- Then provide a description of the parameter group then click Create.

Select the Parameter group for the latest PostgreSQL version and click Parameter group actions -> Edit.

Change the following parameters’ values and click Save changes.
- rds.logical_replication = 1
- wal_sender_timeout = 0
- rds.log_retention_period = 7200
- max_replication_slots = 20

Create Aurora PostgreSQL DB Clusters
Aurora PostgreSQL DB Cluster with version 10.21
On the left navigation section under the Amazon RDS Click the Databases section followed by Create database.

Select the standard create option. For the Engine choose the Amazon Aurora engine.
For Edition choose Amazon Aurora PostgreSQL-Compatible Edition.
And for the Available versions, choose an old version that is available at the time when you working. For now, we select PostgreSQL 10.21.

For Templates choose the Free tier section. It will reduce the cost for creating a database. Here we are going to create a database for testing purposes only. So free tier is enough for now.
Under Settings, for DB instance identifier, provide a name like source-cluster for your database instance.
For master username enter postgres and Master password provide a password for your database username and type the password again for confirmation.

Under the Instance configuration, for DB Instance class select Burstable classes and choose the least size for this demo.
For Availability & durability choose Don’t create an Aurora Replica.
- If you choose the other one it will create a new reader instance in a different availability zone for scalable and high availability. It will cost higher than the first option.
- In production scenarios, we should follow the Aurora Replica creation method for high availability. But for now, just run with a single instance.

- For the Connectivity section, first, select the Don’t connect to an EC2 compute resource option. We can configure it later.
- Next, the network-type chooses IPv4, and VPC, and choose any VPC you want to use. For myself, I choose the default one.
- For the DB subnet group select default.
- For Public access, choose yes. Then only we can connect with our database from outside of the VPC.
- Then for the Security group select the Create new option and provide a Name for it.
- And choose any of the availability zones that you want.

Scroll down and expand the Additional configuration section.
For the Initial database name, enter a name for the database.
Under the DB parameter group choose the parameter group which you create at the beginning of this tutorial for Aurora PostgreSQL version 10.

Leave all other things as default, then click Create database.

Now the source database cluster is created with a database instance.

Aurora PostgreSQL DB Cluster with the latest version
Again we are going to create a PostgreSQL database cluster with the latest version. So click Create database.
For Engine type, choose Amazon Aurora.
For Edition choose Amazon Aurora PostgreSQL-Compatible Edition.
And for the Available versions, choose the latest version which is available at the time when you working. For now, we select PostgreSQL 14.5.

Choose Dev/Test for Templates section.
Under Settings, fill in all the things like the below screenshot.

For instance class choose Burstable classes for this demo purpose and for the Multi-AZ deployment, choose Don’t create an Aurora Replica.

Choose a VPC which you select for the old version database cluster for VPC. Follow the same for the DB Subnet group.
Click Yes for Public access.
For the VPC security group, click Choose existing and choose the security group which is created by the previous database.
And finally, for the Availability zone, choose the same availability zone in which you created your old version database cluster.

Under the Additional configuration, Enter a database name for Initial database name and for the DB cluster parameter group, choose the parameter group you created earlier for the latest PostgreSQL version.

Leave all others as default and click Create database.

Now the second DB cluster with a DB instance also creating. Let them complete the creation.

Modify the Security group, Inbound Rule
In the meantime, let’s modify the Inbound rule in the security group of our database.
Go to the VPC section in the AWS console and select Security groups in the left navigation section.
Choose the security group that you created with the database and select Inbound rules and click Edit inbound rules.

Change the Source to Anywhere and add ‘0.0.0.0/0′ like the picture below. Then click Save rules.

Create Table in Source Database
Navigate to the RDS Databases section and you can see all the DB clusters and the DB Instances are created successfully.

Select the Source DB Cluster, under the Configuration section, You can see the Engine version. So you can confirm this Db cluster is the older version of PostgreSQL.
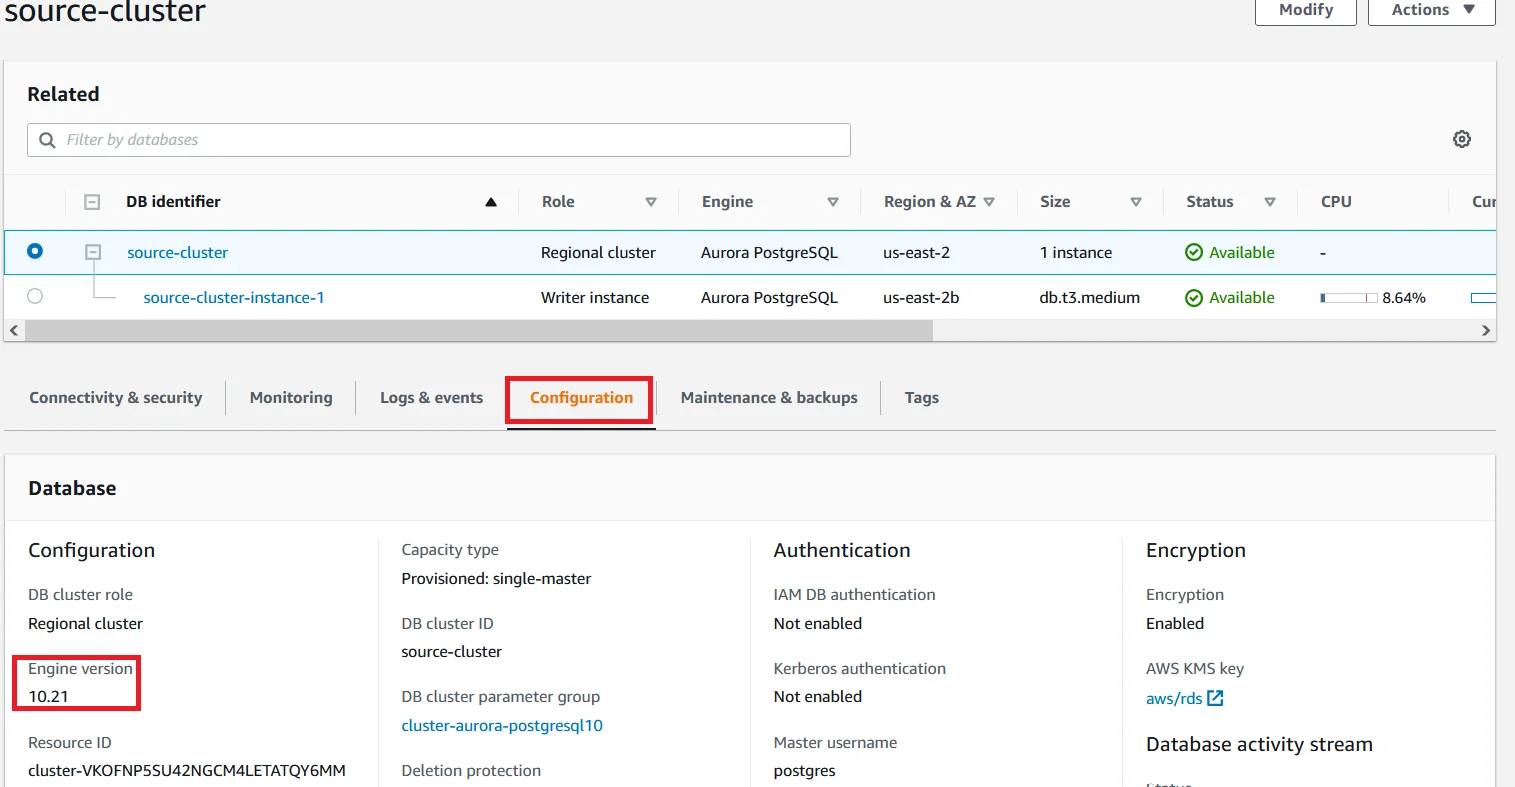
Select the Source DB Cluster, under the Connectivity & security section, you can find the endpoints of your DB Cluster.
Copy the endpoint for the Writer instance and note it somewhere else.

Connect to your EC2 instance via SSH connection and log in as a root user.
This Instance is should be in the same VPC as this DB cluster.
Then run the following command with your source DB Cluster Endpoint.
psql --host=<source_db_endpoint> --port=5432 --username=<db_username> --password --dbname=<db_name>
It prompts for a password for the db user.
Enter the following commands to create a table called ‘COMPANY‘ and insert a row of data into the table.
CREATE TABLE COMPANY(
ID INT PRIMARY KEY NOT NULL,
NAME TEXT NOT NULL,
AGE INT NOT NULL,
ADDRESS CHAR(50),
SALARY REAL
);

INSERT INTO COMPANY (ID,NAME,AGE,ADDRESS,SALARY) VALUES (1, 'Paul', 32, 'California', 20000.00);
Run the ‘\d‘ command to list the tables inside the database.
Run the below command to see the contents of the table.
select * from COMPANY;
Run the command ‘exit;‘ to exit from the database.

Now select the target DB cluster, and under the Configuration section, you can find the database version. For this scenario latest version of PostgreSQL is 14.5.
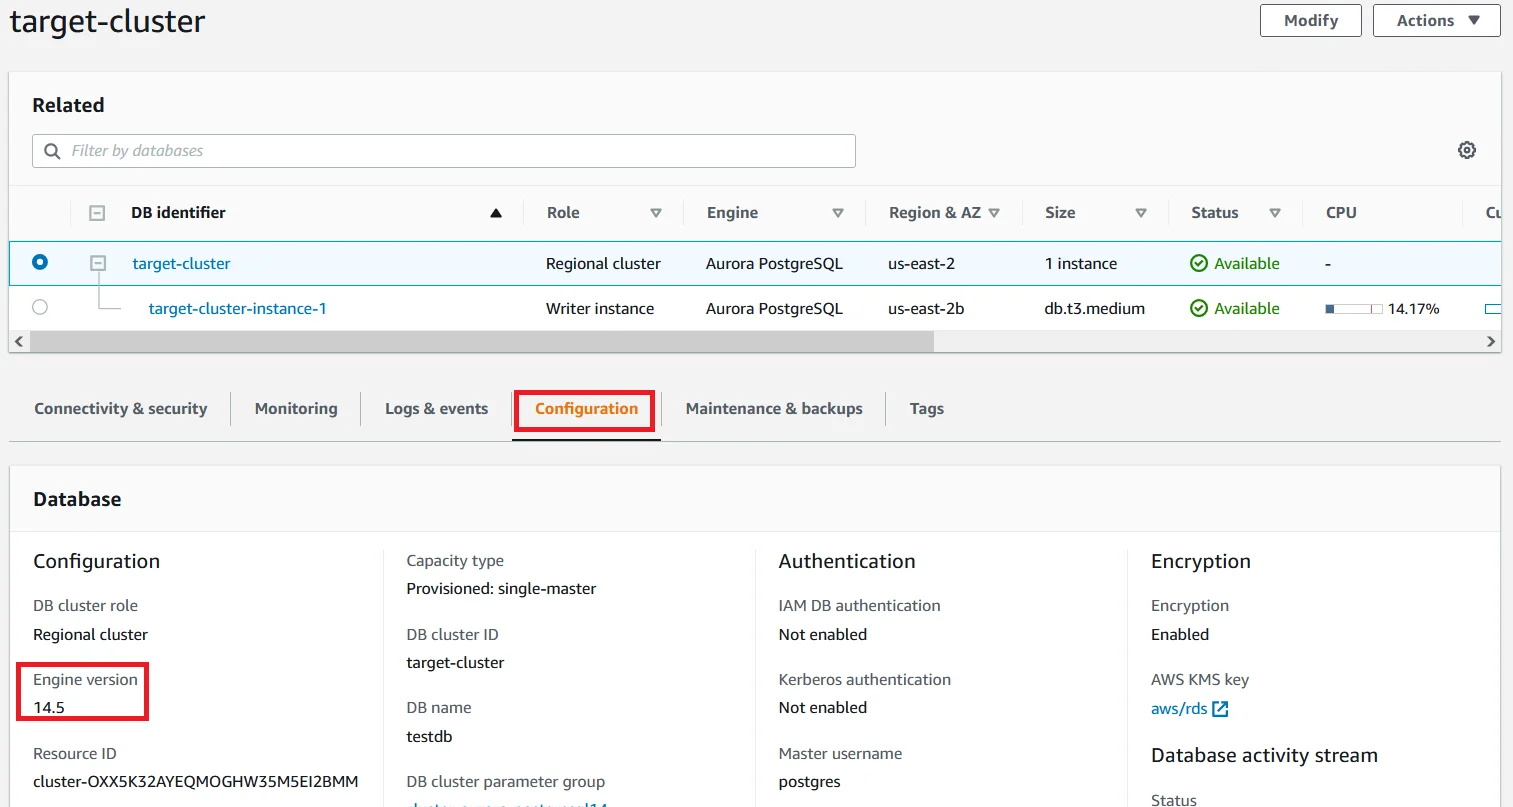
Under the Connectivity & security section, copy the Endpoint for the type of Writer Instance.

Login into the target database with the following command.
For target_db_endpoint, enter the endpoint name of the target cluster.
psql --host=<target_db_endpoint> --port=5432 --username=<db_username> --password --dbname=<db_name>
Run the ‘\d‘ command to see the list of tables. You cannot able to find any table in the target database. Because right now we don’t creates any tables here.
So run the ‘exit‘ command to log out from the target database.

Database Migration Service
Now we are going to migrate the Source Database to the Target database using DMS.
We now follow the same procedure as the previous blog.
Create Replication Instance
Click the below link and follow the process to create a Replication Instance for Database Migration Process.
Link for creating replication instance
For the creation of the replication instance, time will take around 10 to 15 minutes. Wait until the creation is completed.
Create Source and Target Endpoints
Once the replication instance is created click the Endpoints in the left navigation section and then click Create endpoint.

For endpoint type choose Source endpoint and check right for Select RDS DB instance.
For RDS Instance, choose the source DB cluster with the old PostgreSQL version.

- Under the Endpoint configuration, for Endpoint identifier and Source engine are automatically filled with its values.
- For Access to endpoint database, choose to Provide access information manually.
- Enter only the Password for the database. All other things are automatically filled.
 Scroll down to the bottom and expand the Test Endpoint connection.
- choose the same VPC that you using in this demo and choose the Replication instance that you created in the previous step.
- Click the Run test button to check the connection with the database.
- If the Status is showing successful like the below picture, Click the Create endpoint button.

Endpoint for the source database is now Active.
Now click Create endpoint to create the target endpoint for the target database.

For endpoint type choose Target endpoint and check right for Select RDS DB instance.
For RDS Instance, choose the target DB cluster with the latest PostgreSQL version.

- Under the Endpoint configuration, for Endpoint identifier and target engine are automatically filled with its values.
- For Access to endpoint database, choose to Provide access information manually.
- Enter only the Password for the database. All other things are automatically filled.

- Scroll down to the bottom and expand the Test Endpoint connection.
- choose VPC and Replication instance.
- Click Run test and if the connection was successful, Click the Create endpoint button.

All two endpoints are created successfully and in Active status.

Create Database Migration Task
Now it’s time to create a Database migration task.
Navigate to the Database migration tasks section and click Create database migration task.

- For Task identifier, provide a name for the task.
- Choose the replication instance which we created for the Replication instance.
- For the Source database endpoint, choose the endpoint you have created for the source and for the Target database endpoint, choose the endpoint you’ve created for the target.
- For the Migration type, choose Migrate existing data and replicate ongoing changes.

Scroll down and under the Task settings, for the Editing mode choose Wizard.
Change the following and keep the default values to the remaining options:
- Target table operation mode – Truncate
- Turn on validation – Enable
- Turn on Cloudwatch Logs – Enable

- Scroll down under the Table mappings and choose Wizard for Editing mode.
- Expand Selection rules and Click Add new selection rule.
- For Schema select Enter a schema.
- Leave all other things as default. So all tables inside the source database will be migrated to the target database.

Scroll down to the bottom and click Create task.

The migration task gets created. Wait until it shows Running.

Once the creation is completed, you can able to see the Status of the task with Load compile, replication ongoing.
Click the Table statistics, you can see the Load state is like the Table completed.
So the Database migration process is successfully done.

To check, the migration, log in to the target database and run the following command to see if the contents are migrated to this database from the source.
\d
select * from COMPANY;
You can see the table is created and the contents are also stored in the target database.

Check the Replication
In Source Database
First login to the source database and run the following command to add some new rows to the company table.
INSERT INTO COMPANY VALUES (2, 'Arun', 28, 'New York', 20000.00), (3, 'Abishek', 36, 'Chicago', 42000.00), (4, 'Sarath', 26, 'Los Angeles', 25000.00), (5, 'Xavier', 42, 'San Francisco', 39000.00);
Run the below command to see the add rows inside the table.
select * from COMPANY;
exit;
As you can see the table contains a total of 5 rows. Now check whether it will be replicated in the target database or not.

In Target Database
Login into the target database and run the below command to see the replication.
select * from COMPANY;
exit;
You can see that now the table in the target database also has 5 rows.
So all the contents that will add or remove from the source database will also replicate in the target database also.

Final Step
To this point whenever changes or updates are made from the old version source database is parallelly replicated to the secondary database which is the latest PostgreSQL version. But we need to set up the latest PostgreSQL version database as the primary one. For this just point to the upgraded database as the primary database inside the application code. Now the application will use the database which was upgraded to the latest version. Then delete the old Aurora PostgreSQL version database.
We are successfully upgrading the RDS Aurora PostgreSQL database to the latest PostgreSQL version with nearly zero downtime. During this process, there will no downtime in your application.
That’s all I want to show you. See you in the next article. Thank you.

